
Overview
The Dynamics 365 Connector is a Snowflake Native App designed to streamline data ingestion from Dynamics 365 applications or Dataverse into Snowflake, enabling businesses to perform advanced analytics, reporting, and data management in a cloud-based environment. It leverages Azure Synapse Link with incremental CSV folders in the Azure Data Lake to automatically bring data into Snowflake, utilising incremental updates and folder structures for efficiency.
Key Features
- Seamless Data Integration The connector simplifies importing data from Azure Synapse Link into Snowflake, providing support for the incremental timestamp-based folder structure used in Azure Synapse Link.
- Near-Real-Time Data Updates It allows organisations to work with near-real-time data from Dynamics 365 applications, ensuring timely insights and analytics.
- Advanced Analytics Capabilities Snowflake’s platform allows businesses to use their Dynamics 365 data for advanced analytics, reporting, and business intelligence (BI) with tools such as dbt, Tableau, or Power BI.
- Scalable and Secure As a native Snowflake application, the Dynamics 365 Connector is designed to handle large data volumes in a scalable manner, ensuring data integrity and security.
- Automated Data Refresh The connector automates the process of ingesting new or updated data, eliminating manual data transfers or custom-built data pipelines.
Business Benefits
- Increased Efficiency Reduces the time and resources needed to manually integrate Dynamics 365 or Dataverse data into Snowflake.
- Near Real-Time Insights Facilitates faster decision-making with near real-time data ingestion.
- Enhanced Data Accessibility Centralises Dynamics 365 data in a cloud platform, making it more accessible for cross-departmental reporting and analytics.
- Improved Scalability Ensures data can be handled and scaled efficiently, without impacting performance, no matter the size of the organisation.
- Enhanced Security and Compliance Snowflake provides a secure, compliant platform for handling sensitive business data from Dynamics 365, ensuring robust data governance practices.
Technical Details
- Data Source Azure Synapse Link, Dataverse with incremental folder structure in the Azure Data Lake.
- Destination Snowflake Cloud Data Platform.
- Supported Dynamics Applications Microsoft Dynamics 365 Finance, Supply Chain Management, CE, Commerce, and any Dataverse-backed Dynamics 365 or Power Platform apps.
- Data Ingestion Mechanism Incremental data updates using timestamp-based folder structures from Azure Synapse Link.
- Integration with Analytics Tools Easily connects with analytics platforms such as dbt, Power BI, Tableau, and other BI tools.
Use Cases
- Unified Data Warehousing Centralising all business data from Dynamics 365 in Snowflake to create a single source of truth for data analysis and reporting.
- Financial Reporting Ingest financial data from Dynamics 365 Finance into Snowflake for advanced financial forecasting and reporting.
- Supply Chain Optimisation Import Dynamics 365 Supply Chain Management data for near real-time monitoring and optimising supply chain operations.
- Customer Insights Leverage Dynamics 365 Commerce or Sales data for better customer profiling and predictive analytics in Snowflake.
Setup & Configuration
- Install the Connector
The Dynamics 365 Connector is available via Snowflake’s Native Application Marketplace. Install the connector directly within Snowflake. - Grant Required App Privilege
Grant the required privileges, events and logs from UI- Account level privileges: EXECUTE TASK and EXECUTE MANAGED TASK.
- This app collects ERROR-level logs and records TRACES ON EVENT. Enable these logs and event sharing. The information collected includes the timestamp folder names in the Azure Datalake and entity names within each folder.
- Configure Azure Synapse Link
Ensure your Dynamics 365 application is set up to use Azure Synapse Link for data export. - Create Storage Integration
Please read Guide: Set up Storage Integration in Snowflake. - Create Notification Integration
Please read: Set up Notification Integration in Snowflake. - Grant USAGE Privilege
After you create the Snowflake Storage Integration and Notification Integration, grant USAGE privilege to the app using the following commandsgrant usage on integration <your_storage_integration> to application dynamics_365_connector; grant usage on integration <your_notification_integration> to application dynamics_365_connector;
- Create New D365 Environment
Set up a new environment in the app connected to a Dynamics 365 Azure Data Lake container. - Set Data Synchronisation Scheduled data synchronisation depending on business requirements and Azure Synapse Export frequencies.
- Start Querying Data Once the data is ingested, users can start querying the data in Snowflake using standard SQL and integrating it with analytics tools.
Conclusion
The Dynamics 365 Connector provides businesses with a powerful, efficient, and scalable solution for ingesting Dynamics 365 and Dataverse data into Snowflake. This enables organisations to better manage their data, perform advanced analytics, and make data-driven decisions, all within a secure, scalable cloud platform.
You are required to create the following Snowflake integration objects in your Snowflake account and grant the necessary usage privileges to this application. Furthermore, when setting up a new environment, you will need to provide these objects in the Create Environment form.
Should you require assistance in creating these objects, please do not hesitate to reach out to us. We are here to support you.
Storage Integration
To facilitate the ingestion of data from the Azure Storage Account where the Azure Synapse Link exports data, it is imperative to create a Snowflake storage integration. This integration acts as a bridge, allowing Snowflake to securely access and retrieve data stored in Azure.
When setting up the storage integration, it is essential to ensure that it is configured with the appropriate permissions and access rights. Specifically, the storage integration must be granted access to the Azure Synapse Link’s Azure Storage container. This access is crucial for enabling seamless data flow and integration, ensuring that Snowflake can efficiently ingest the data it requires for analytics and reporting.
Additionally, proper configuration of the storage integration not only enhances data accessibility but also optimizes performance and resource utilization within Snowflake. By ensuring that the integration is correctly set up, organizations can achieve reliable and timely data ingestion, which is vital for informed decision-making and operational efficiency.
Notification Integration
A notification integration is essential to inform Snowflake when a new data folder is ready for ingestion. Implementing this integration not only streamlines the data ingestion process but also optimizes resource utilization. By leveraging a notification integration, organizations can substantially reduce the costs associated with synchronizing the data lake file list with Snowflake.
This proactive approach minimizes the need for continuous polling or manual checks, ensuring that Snowflake is promptly updated with the latest data. Consequently, it enhances operational efficiency and allows for more timely access to critical data for analysis and reporting.

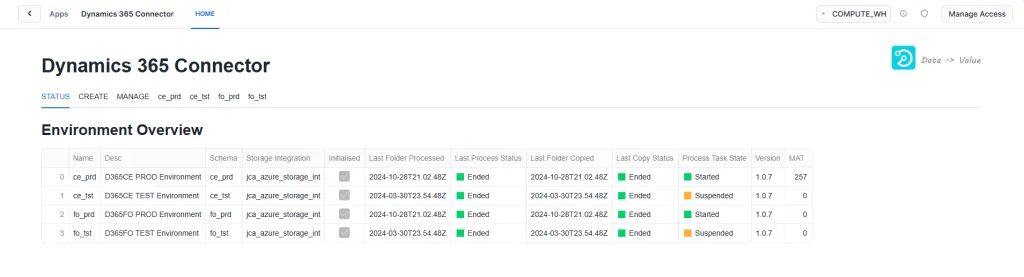
The Status tab of the UI provides a comprehensive overview of various operational metrics and statuses for each environment. Here’s a detailed breakdown of the information displayed in this tab:
- Name The name of an environment created in the Dynamics 365 connector.
- Database Schema The database schema associated with each environment which the Dynamics 365 data will be imported into.
- Last Data Lake Folder Processed Displays the most recent folder that has been processed in the data lake, indicating the latest scheme process activity.
- Last Process Status Reflects the outcome of the most recent schema processing operation for each environment. Possible values include: Executing, Ended and Error.
- Last Data Lake Folder Copied Shows the last folder that was successfully copied to the target Snowflake database schema, helping monitor data transfer success.
- Last Copy Status Indicates the status of the most recent data copy operation. This status shows whether the data was successfully copied and can include: Executing, Ended and Error.
- Process Task Status Indicates the current status of the data processing task for each environment, which can include: Suspended, Started.
- Version The environment version. In the event of an app upgrade, each environment needs to be stopped and upgraded by reinitialising the environment.
- MAT Monthly Active Table. In the usage-based listing, customers are charged per MAT. One MAT means a table has been copied during a billing month. The same table ingested multiple times or to various environments within the month will only count as one MAT, while any table without data ingestion that month won’t be counted.
The Status tab serves as an essential dashboard for monitoring the health and performance of environments connected to the Dynamics 365 connector. By providing visibility into the database schema, batch sizes, data lake processing, and operational statuses, users can ensure that data integration processes are running smoothly and address any issues promptly.
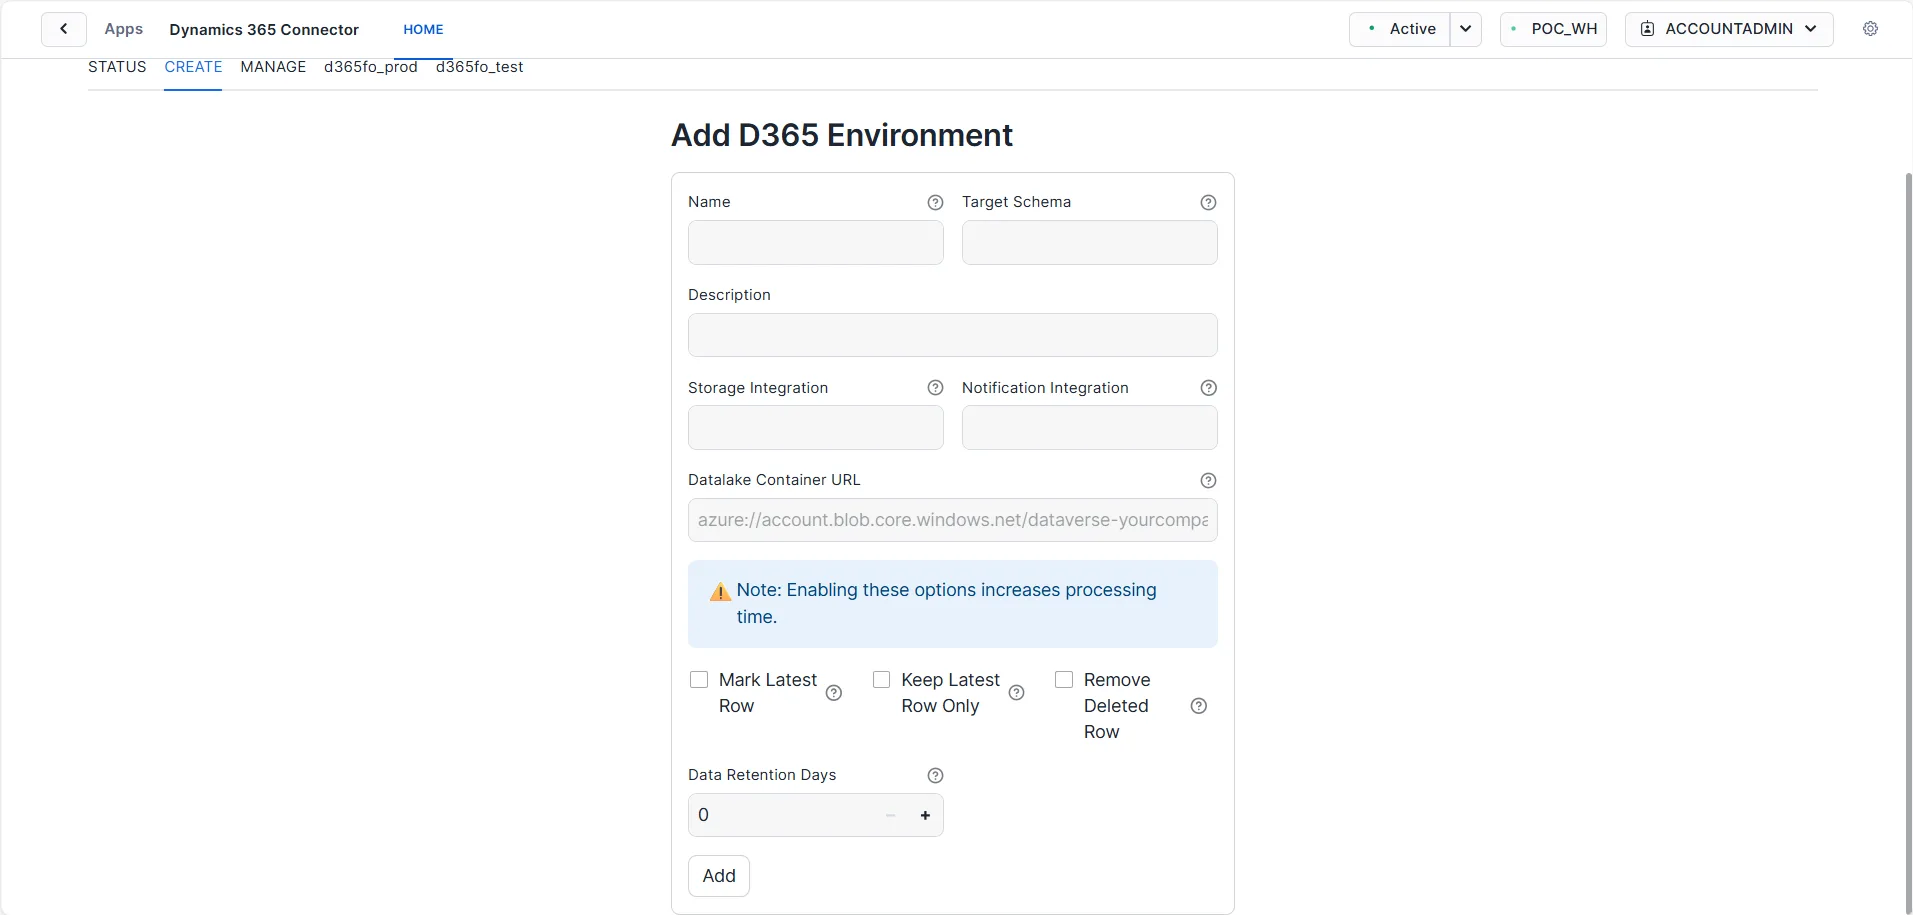
The Create tab of the UI enables users to establish a new environment linked to a Dynamics 365 environment and an Azure Data Lake container. Users can specify the following details:
- Name Assign a name to the new environment.
- Target Schema Specify the database schema into which the data will be imported.
- Description Provide a brief overview of the environment.
- Storage Integration The name of an existing Snowflake external storage integration with access to the data lake. Please grant usage permissions for this integration to the app.
- Notification Integration The name of an existing Snowflake notification integration with access to the Azure Storage Queue. It is used to auto-refresh the stage directory table. Please grant usage permissions for this integration to the app.
- Data Lake Container URL The URL for the storage container that will be used to create an external stage, e.g., azure://account.blob.core.windows.net/dataverse-jayconsulting/. Please use a ‘/’ at the end of the URL.
- Mark Latest Row Checkbox Column “jca_is_current” will be updated to identify the latest version of each record. “jca_is_current” will have null values if not enabled.
- Keep Latest Row Only Checkbox Choose to retain only the most recent row of data.
- Remove Deleted Checkbox Opt to delete any records marked as deleted.
- Data Retention Days The number of days to retain data in the table. Default: 0 days (all data). The app will automatically delete data older than this value based on “jca_loaded_at” column.
- Process Batch Size The batch size determines the number of entities that can be processed concurrently. With a dedicated XS warehouse and a single environment, an optimal batch size is 30. From version 1.0.3, the app uses serverless tasks, making this setting 100 and not settable by the users.
This functionality allows for flexible and efficient environment creation, streamlining data management and integration processes.
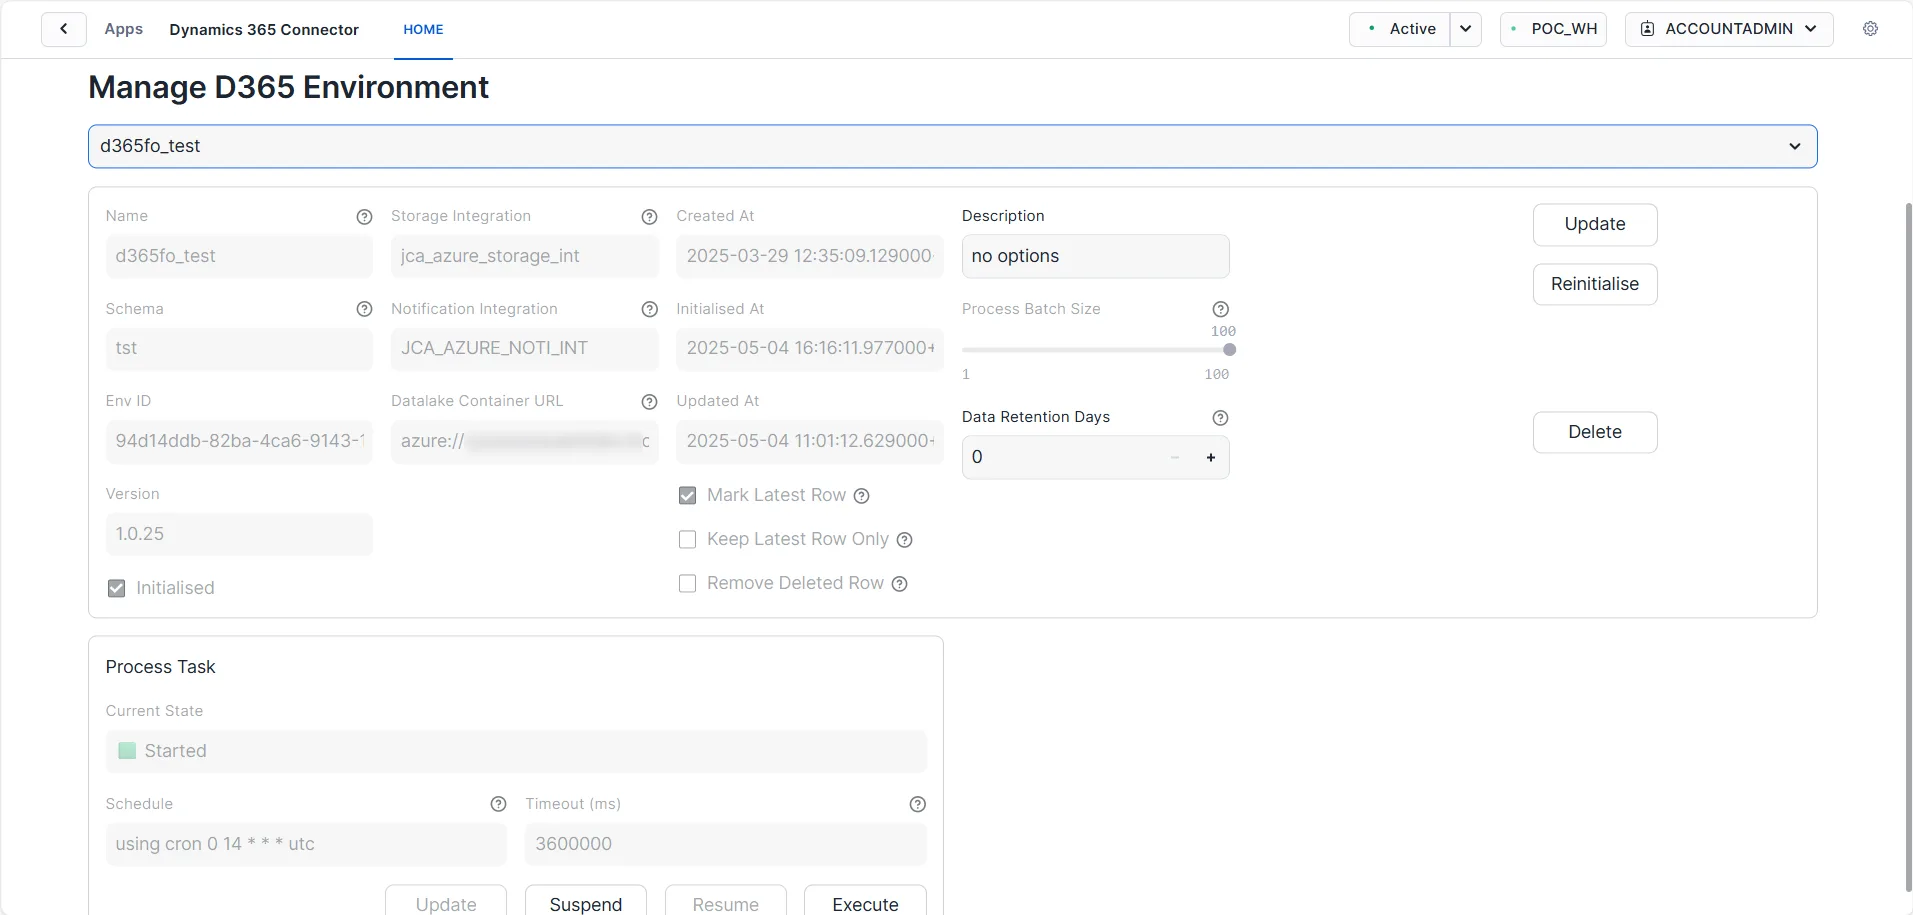
The Manage tab of the UI provides users with essential functionality for overseeing their environments. Within this tab, users can:
- Update Environments Modify existing environments to reflect changes in configuration, including adjustments to the target schema, description, storage integration, and batch sizes. This ensures that the environments remain aligned with evolving data management needs.
- Initialise Environments Set up or reset an environment to prepare it for new data processing tasks. Initialising may involve clearing configuring parameters to start fresh, enabling users to establish a clean slate for data ingestion and processing. The initialisation will sync the file list from the data lake into Snowflake. This process can take a while if there are many existing folders or files in the data lake. We recommend creating a new Link profile in Azure Synapse Link, which will generate only a few folders in the data lake. Afterwards, you can set up and initialize the app environment for a more efficient process.
Once an environment is initialised, only the Description, Process Batch Size and Data Retention Days can be updated. From version 1.0.3, Process Batch Size is not settable and defaults to 100.
- Delete Environments Remove environments that are no longer needed. This functionality allows users to manage their resources effectively by eliminating unused or redundant environments, thereby maintaining an organised and efficient workspace.
Once the environment is initialised, users can:
- Configure Process Task Users can configure the associated process tasks for each environment. This includes:
- Add Schedule Set up a schedule for when tasks should run, allowing for automated data processing at specified intervals.
- Suspend/Resume Task Temporarily pause the process task if adjustments are needed, or resume it when ready, providing flexibility in managing ongoing operations.
- Execute Task Manually trigger a task to run immediately, enabling users to quickly process data as needed without waiting for the scheduled time. This process task has a 60-minute timeout. If the process times out during execution, the next run will resume from the last successfully processed folder, ensuring continuity without starting from the beginning.
The Manage tab is crucial for users who need to maintain control over their environments, ensuring they can adapt to changing requirements and effectively manage their data processes.
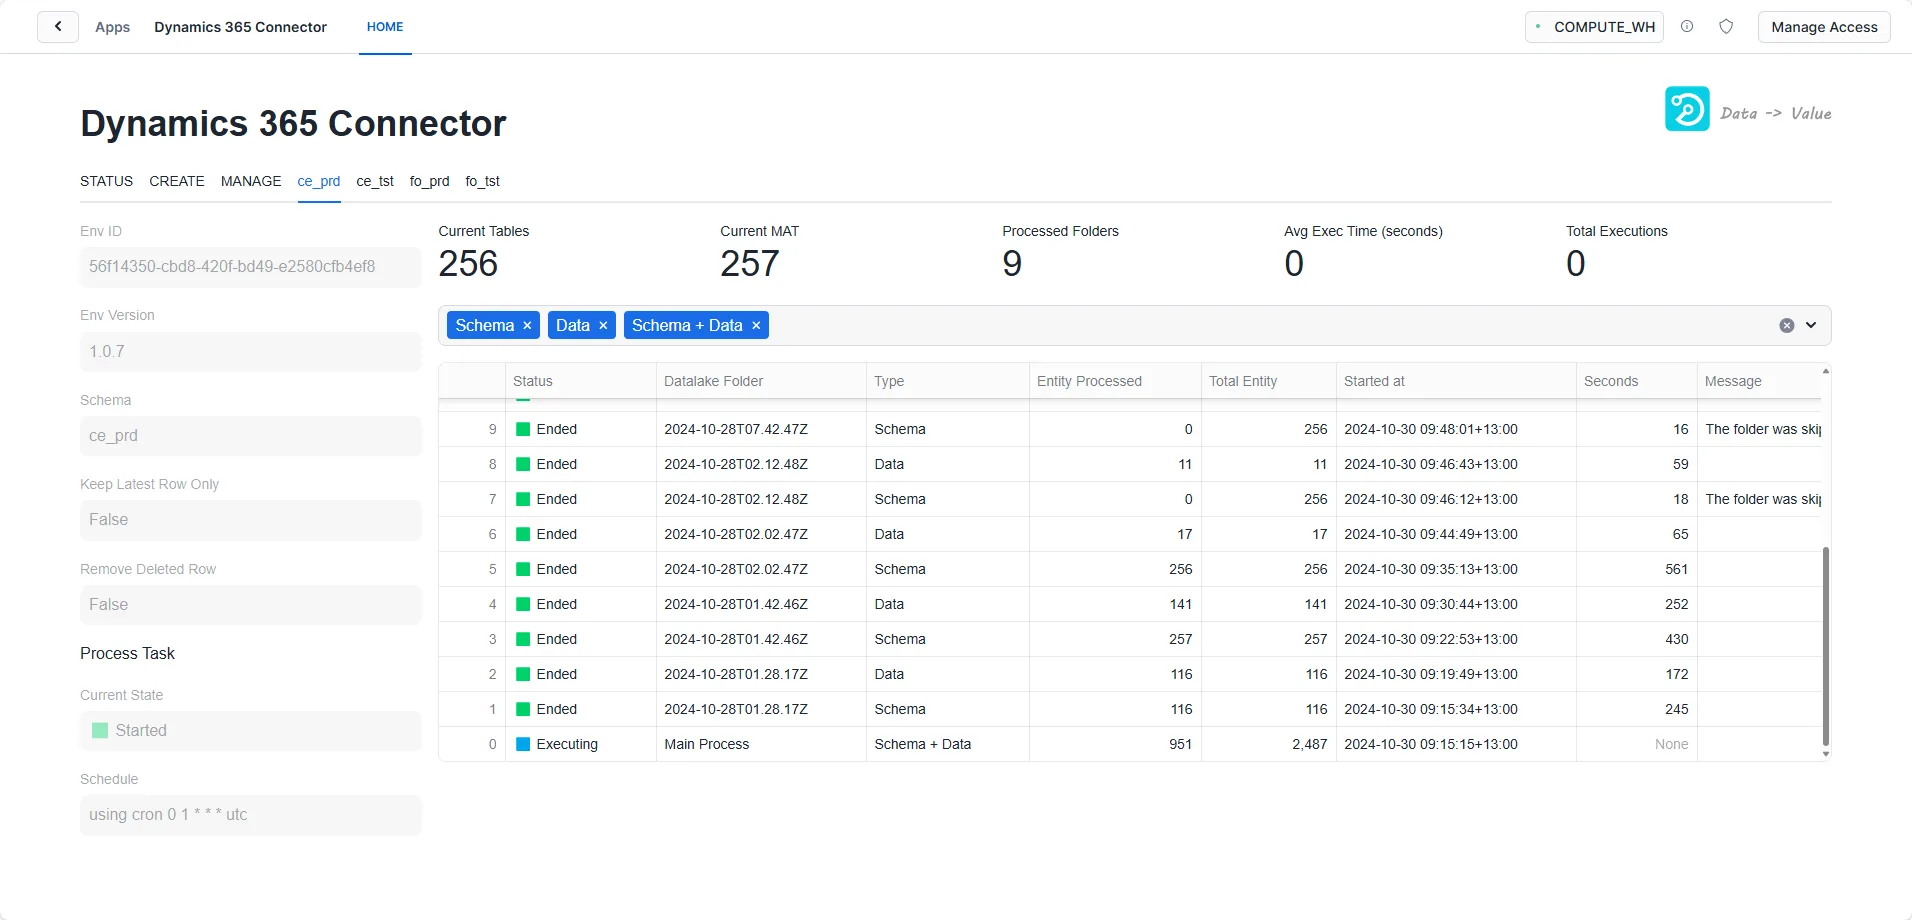
A dedicated UI tab will provide users with detailed insights into the status and task process history for each created environment. This tab is vital for effectively monitoring and managing the specific environment.
In the screenshot above, four environments are created, namely “ce_prd”, “ce_tst”, “fo_prd” and “fo_tst”.
Key Features of the Dedicated Environment UI Tab
- Status Overview Users can quickly view the current status of the environment, including whether it has been started, suspended, or is experiencing any issues. This overview helps assess the environment’s health and performance at a glance.
- Task Process History The tab maintains a comprehensive log of all task executions associated with the environment. Users can track past operations, including:
- Execution Dates and Times Detailed timestamps for when each task was initiated and completed.
- Outcome of Each Execution Information on whether tasks are executing, ended, or error, providing insight into operational efficiency and any issues that may need addressing.
- Duration of Execution The time each execution takes to complete, helping users identify performance trends and optimise processing times.
- Actionable Insights The dedicated tab may highlight any warnings or errors during task execution and suggest actions for resolution. This proactive approach aids users in troubleshooting and maintaining seamless operations.
This dedicated UI tab enhances user experience by centralising critical information, enabling effective monitoring and management of each environment’s processes. By providing clear visibility into the status and task history, users can make informed decisions and ensure efficient data management practices.

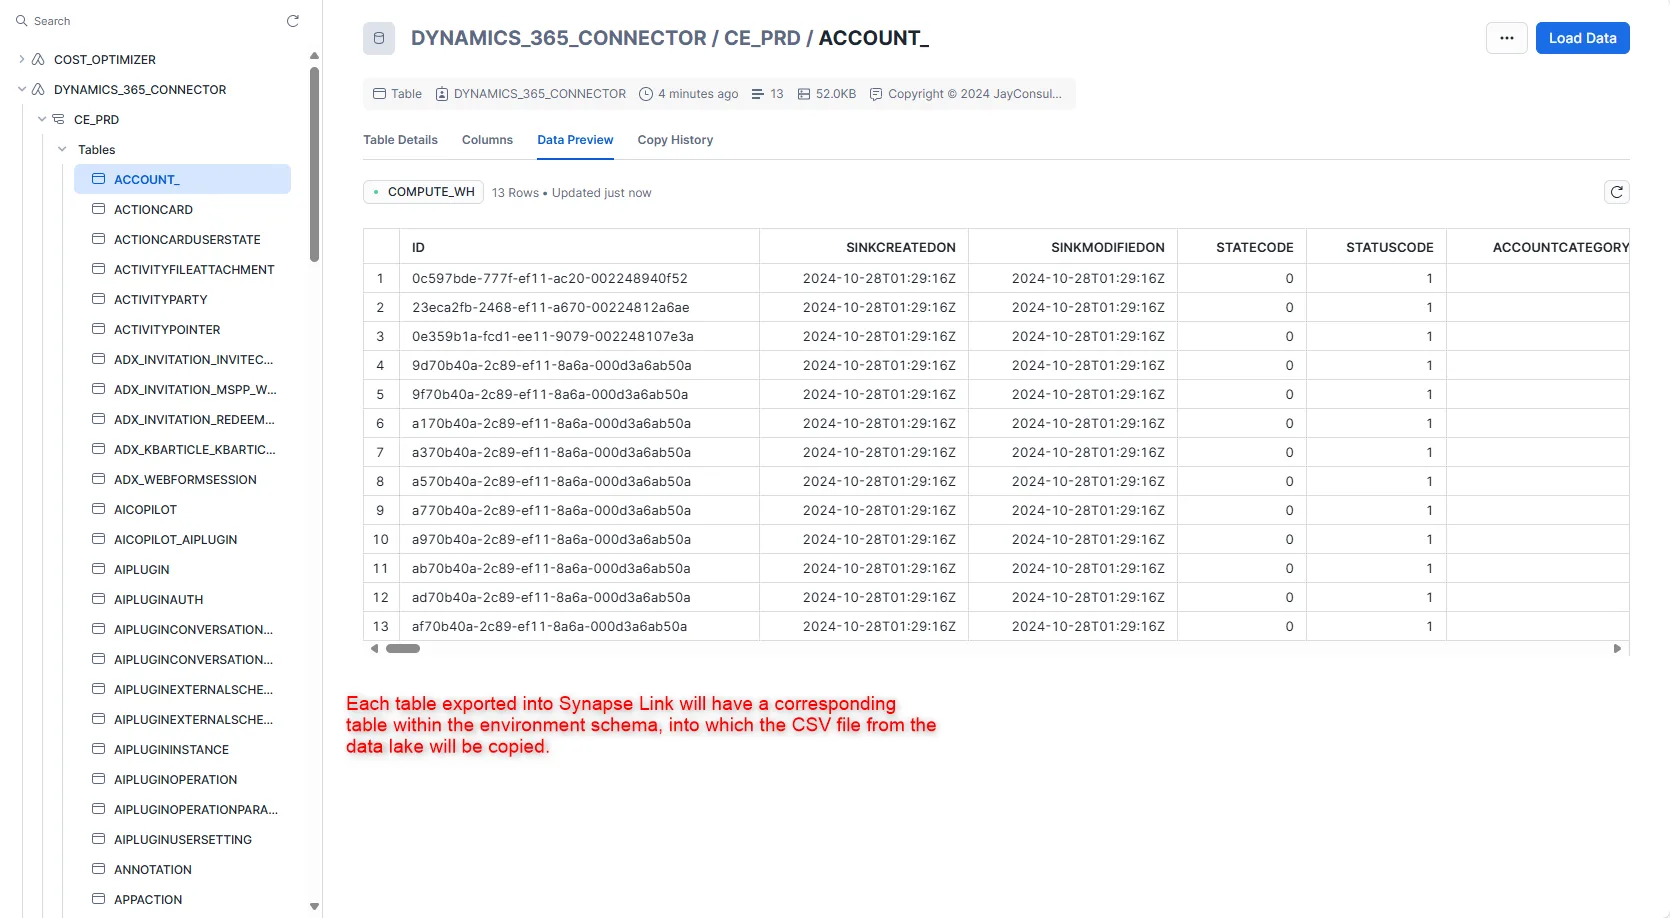
The app database will associate a database schema with each created environment. This schema is essential for managing and structuring the data processed and stored within the environment.
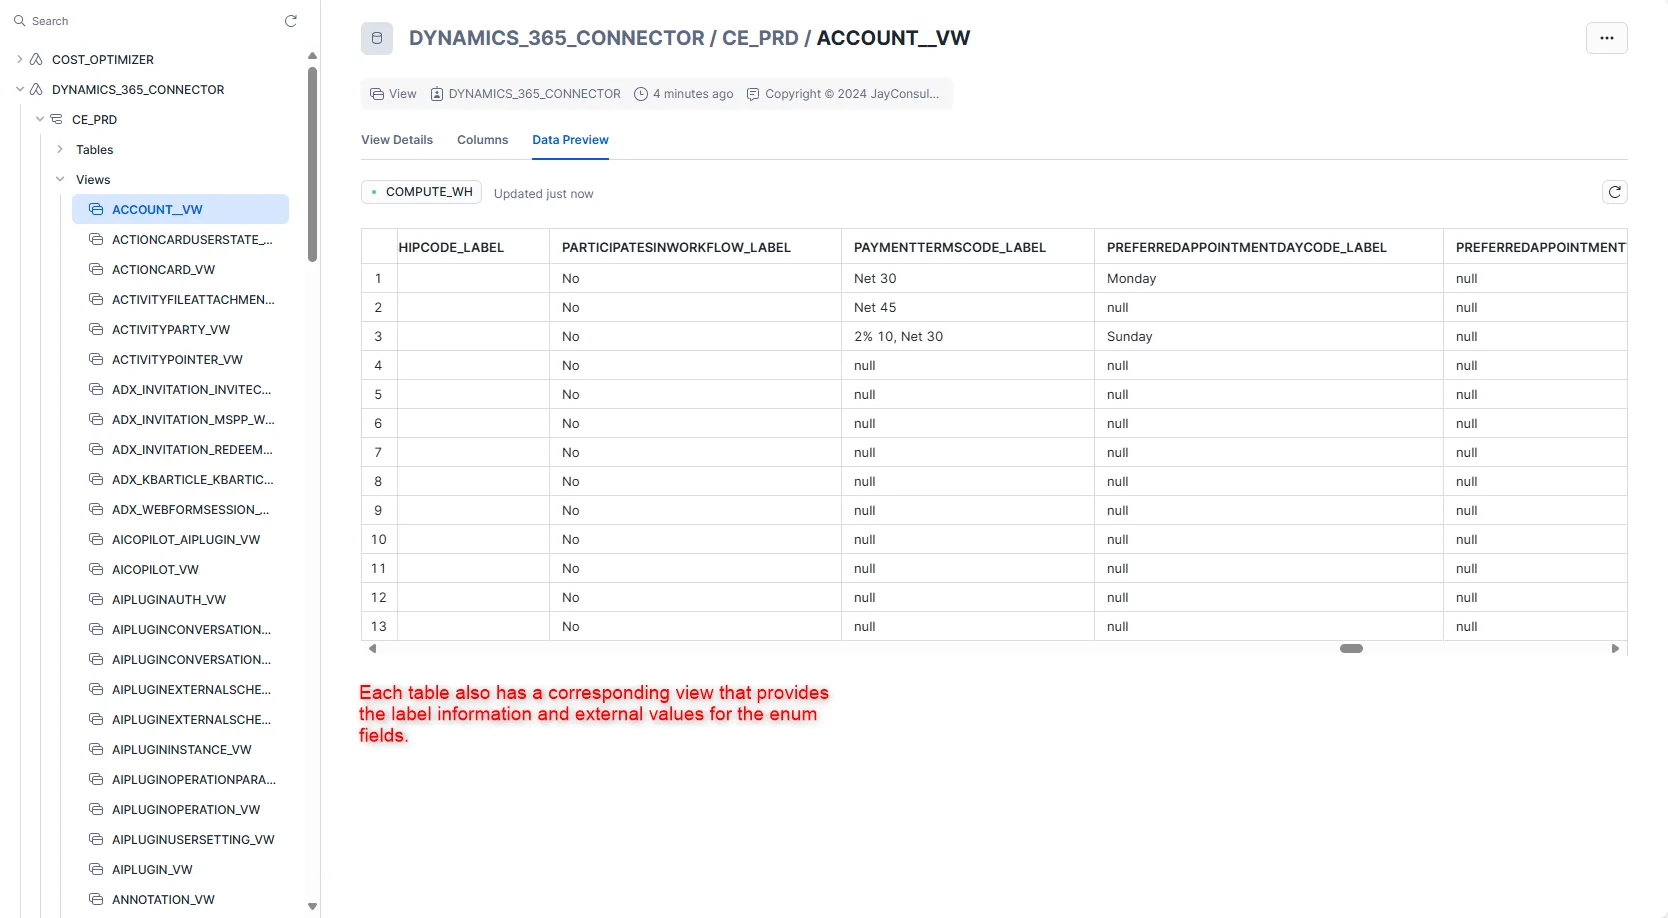
Each table in the data lake will have a corresponding table and view in the associated schema. This relationship ensures seamless integration between the data lake and the app database, allowing users to access and manipulate data easily.
The views associated with each table augment the data by adding enumeration (enum) values and labels. This enhancement gives users a more meaningful representation of the data, making it easier to understand and interpret.
- Enum Values The views can include additional fields that represent enum values, which standardise data categorisation and allow for consistent data interpretation across different processes and reports.
- Labels Including labels alongside enum values provides context, allowing users to identify and comprehend each data point’s significance quickly. This improves usability and aids in decision-making.
- External Value The enum item name. Only applicable for D365FO.
- Log into the Azure Portal.
- Follow the Microsoft documentation to create a storage account.
- Create a storage account to use with Azure Data Lake Storage
- Choose a Standard general-purpose v2 account type.
- In the Advanced settings, make sure to enable the hierarchical namespace.
- Enable Azure Synapse Link in Dynamics 365
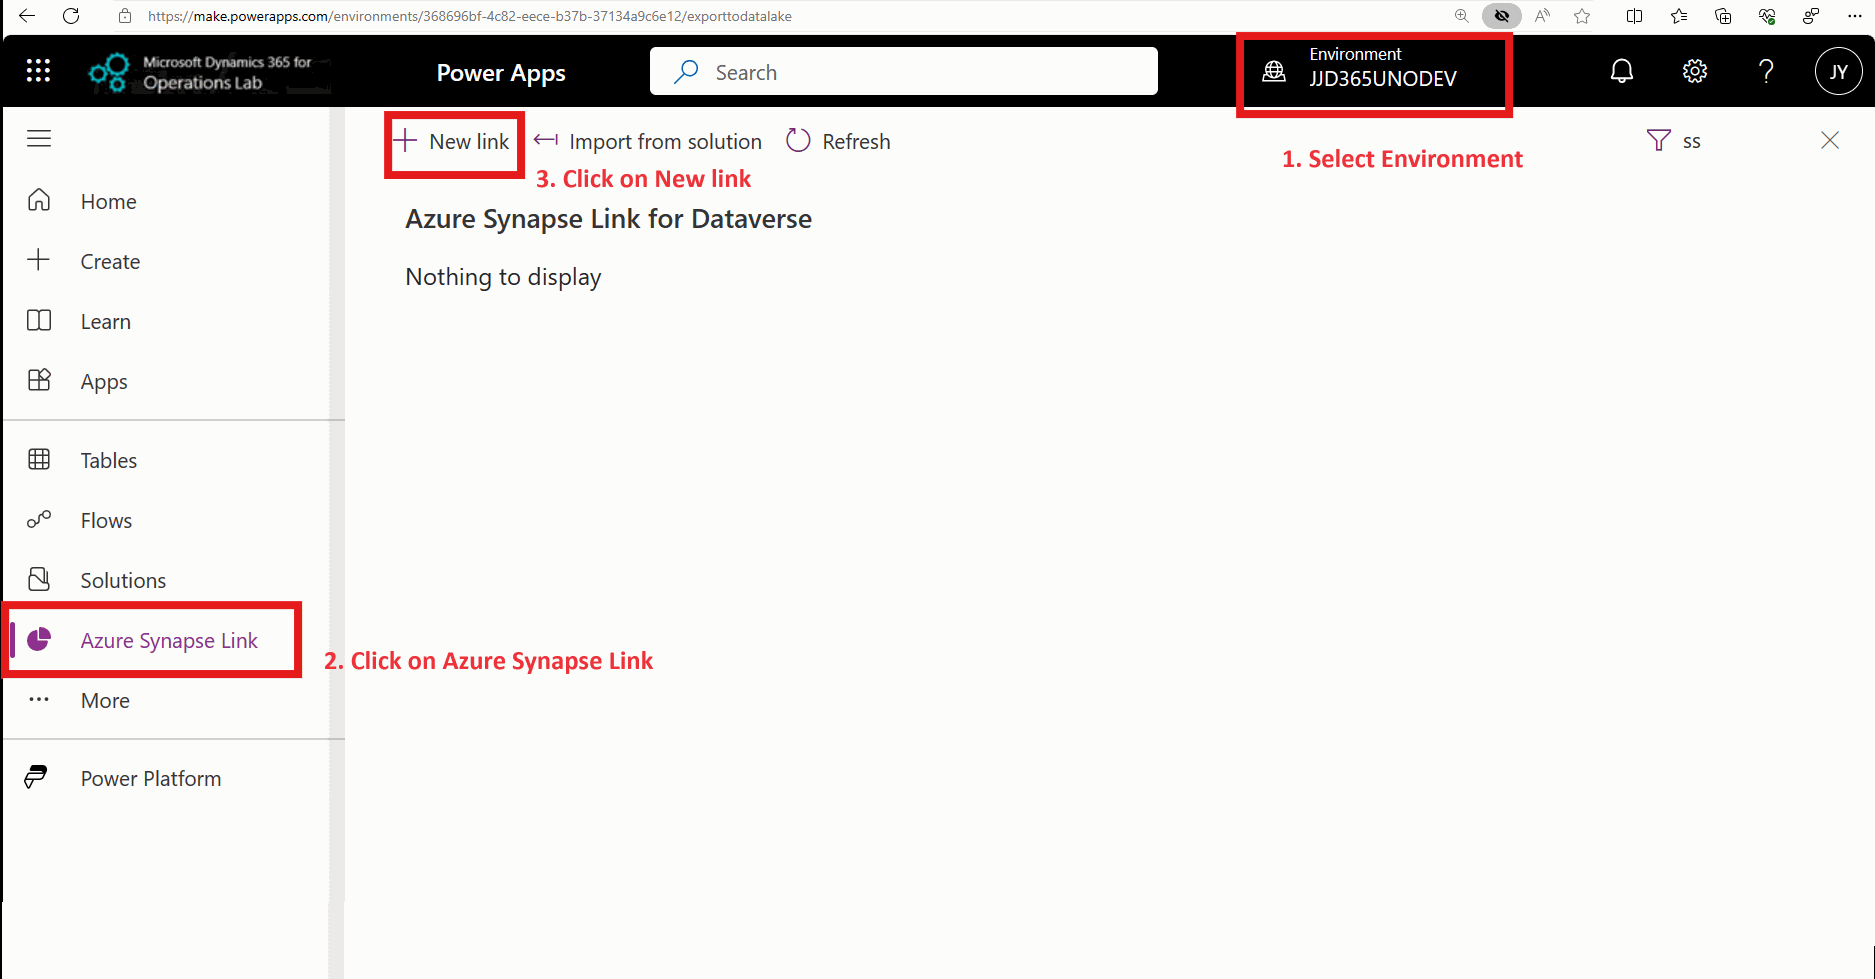
- Sign in to Power App
Open your Power Apps and log in to the Dataverse environment linked with D365FO environment. - Create Azure Synapse Link
- On the left navigation pane, select Azure Synapse Link.
- On the Azure Synapse Link for Dataverse page, select + New link on the command bar.
- Select Azure Storage Account
- Select Subscription, Resource group and a Storage account. You don’t need to provide a Synapse workspace or a Spark pool.
- Select Next. The option to choose tables appears.
- Enable Incremental Update Folder Structure
- Select Advanced, select Show advanced configuration settings, and then enable the option Enable incremental update folder structure
- In the Time interval field, choose the desired frequency for reading incremental data. Using this frequency, the system partitions data into time stamped folders such that you can read the data without being impacted by ongoing write operations.
- Select the Dataverse tables you want. You can also select finance and operations tables. The options Append only and Partition available at a table level are ignored. Data files are always appended and data is partitioned yearly.
- Select Save. Tables selected are initialized and you see incremental data in the storage account.

- Sign in to Power App
Please see Microsoft documentation for more detail.
- Log in to Snowflake
Access your Snowflake account through your Snowflake web interface. - Create Storage Integration
You can create a storage integration using the Snowflake SQL command. Here’s a template command:create storage integration <your_storage_integration> type = external_stage storage_provider = 'azure' enabled = true azure_tenant_id = '<your_azure_tenant_id>'
storage_allowed_locations = '<your_container_url>'
;- <storage_integration_name> is the name of the storage integration object.
- <azure_tenant_id> is your Azure tenant ID.
- <azure_container_location> is the location of the Azure storage containers where the incremental folders reside.
- Run the code below to get the Azure Consent URL and the integration name.
describe integration <storage_integration_name>;
Copy the auzre_consent_url and paste it into a browser. Follow the on-screen prompt to give authorisation. Note down the azure_multi_tenant_app_name; this will be used to access the Azure storage container.
- In Azure Portal, Navigate to the Azure Data Lake container. Under Access Control (IAM), assign the Storage Blob Data Reader role to the newly created azure_multi_tenant_app_name.
Please follow the detailed instructions from Snowflake Documentation:
- Create an Azure Storage Queue
- Open Azure Portal
Navigate to your Azure Portal: Azure Portal. - Create a Storage Queue
- Go to your Storage Account.
- Under Data Storage, select Queues.
- Click on + Queue to create a new queue.
- Enter a name for your queue and click OK.
- Open Azure Portal
- Create an Event Grid Subscription
- Navigate to Event Grid
In the Azure Portal, search for Event Grid and select Event Subscriptions. - Create a New Event Subscription
Click on + Event Subscription. - Configure the Event Subscription
- Name: Provide a name for your event subscription.
- Event Schema: Select Event Grid Schema.
- Event Type: Choose the types of events you want to listen to (e.g., Blob Created, Blob Deleted, etc.).
- Endpoint Type
- Choose Azure Storage Queue as the endpoint type.
- Under Endpoint, select your storage account and then select the queue you created earlier.
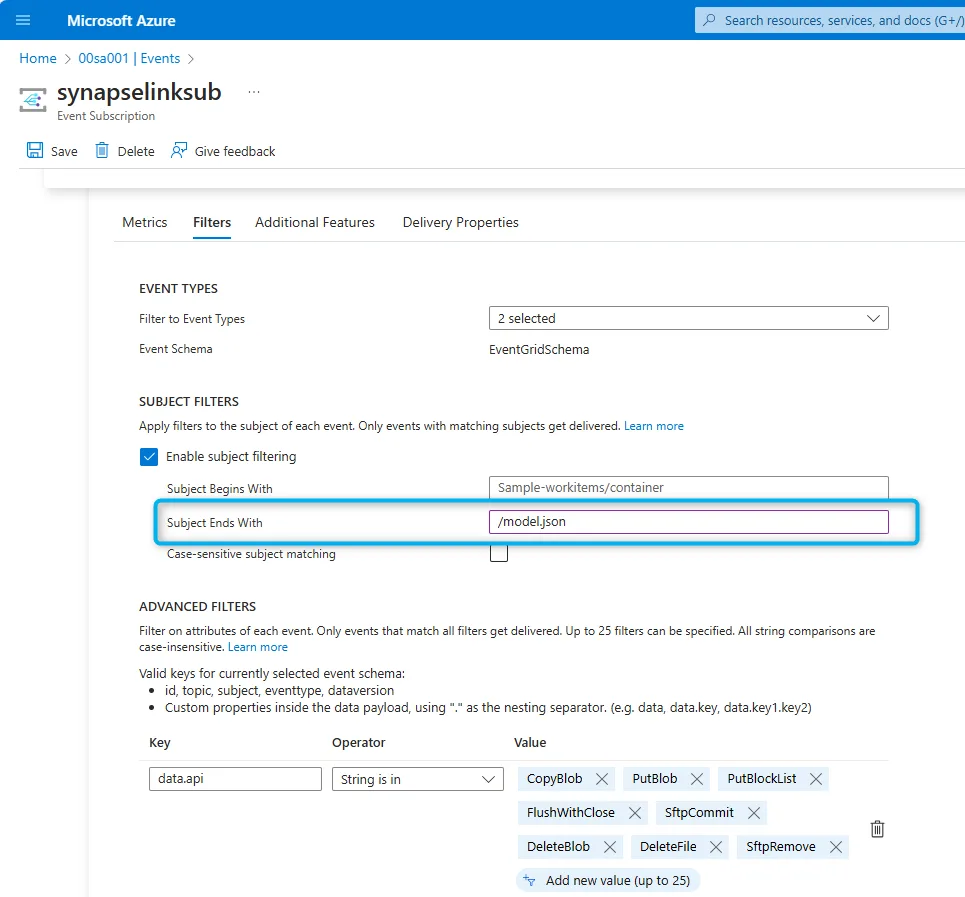
- Filter Options
Add filters sent to the queue. When setting up an Azure Event Grid Subscription, utilising subject filters to refine the events that trigger the subscription is beneficial. Specifically, you can configure the filters to capture only those events where the subject ends with /model.json. This approach is particularly advantageous for applications designed to synchronize model.json files into Snowflake.By focusing solely on the model.json files, the system can efficiently monitor for changes and automatically sync data when new folders are added. This targeted filtering not only streamlines the data ingestion process but also reduces the volume of irrelevant events that need to be processed.Implementing subject filters enhances performance by minimizing the load on the event processing system and ensuring that Snowflake remains updated with the most pertinent information. This method promotes an efficient workflow, enabling timely access to critical data for analytics and reporting purposes.

- Create Subscription
Click Create to finalize the event subscription.
- Navigate to Event Grid
- Log into Snowflake
Access your Snowflake account.- Create the Notification Integration
Use the following SQL command to create a notification integration for Azure Storage Queue:create notification integration <your_notification_integration> type = queue notification_provider = azure_storage_queue enabled = true
azure_tenant_id = '<azure_tenant_id>' azure_storage_queue_primary_uri = '<azure_storage_queue_primary_uri>' ;where
- <notification_integration_name> is the name of the notification integration object.
- <azure_tenant_id> is your Azure tenant ID.
- <azure_storage_queue_primary_uri> is a queue created for receiving data lake blob create events.
- Run the code below to get the Azure Consent URL and the integration name.
describe integration <notification_integration_name>;
Copy the auzre_consent_url, paste it into a browser, and follow the on-screen prompt to give authorisation. Note down the azure_multi_tenant_app_name; this will be used to access the Azure Storage Queue.
- Create the Notification Integration
- In Azure Portal, navigate to the Azure Data Lake queue. Under Access Control (IAM), assign the Storage Queue Data Contributor role to the newly created azure_multi_tenant_app_name.
- Verify the notification integration.
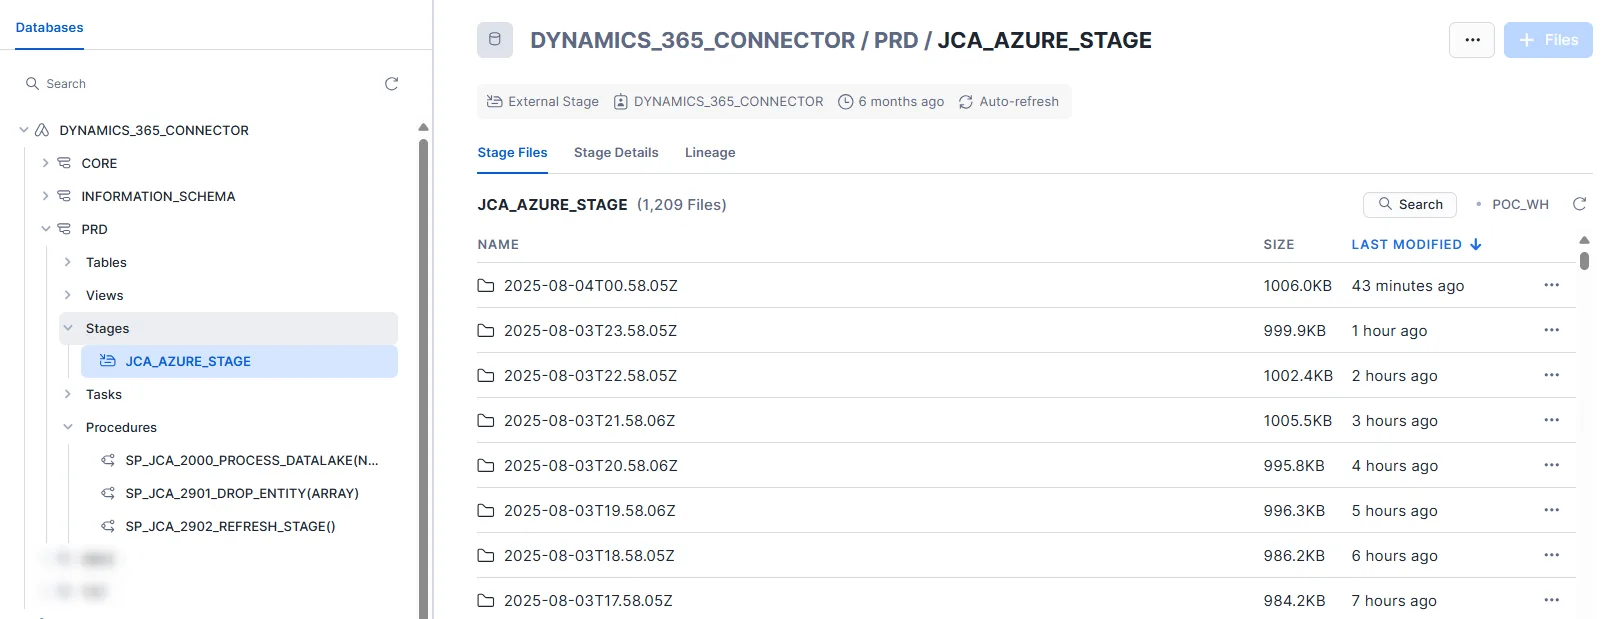
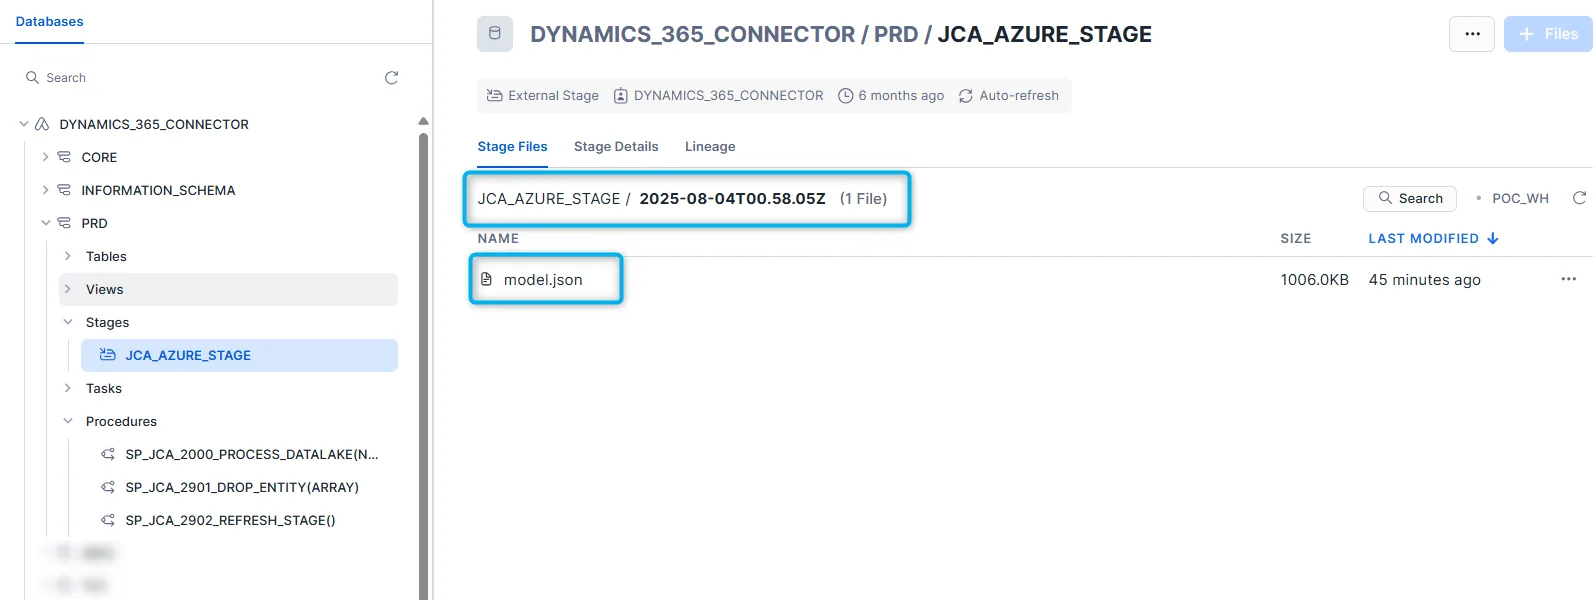
- Each created environment will have an external stage mapped to the Data Lake container. This stage mirrors the full container folder and file structure of the container at the time of environment initialisation.
- After initialisation, any newly created folders in the Data Lake should be reflected in the stage through the notification integration. If the latest folders aren’t showing up, it’s worth verifying that the notification integration is correctly set up — it’s responsible for triggering the stage refresh when new folders or model.json files are added.
Folders updated from the notification integration:

These folders should only have model.json file in them:
Please follow the detailed instructions from Snowflake Documentation:
After the Storage Integration is created, please grant usage privileges to the app.
grant usage on integration <your_storage_integration> to application dynamics_365_connector;
Where:
<storage_integration> is the storage integration you created following the steps above or an existing one you already have.
After the Notification Integration is created, please grant usage privileges to the app.
grant usage on integration <your_notification_integration> to application dynamics_365_connector;
Where:
<notification_integration> is the notification integration you created following the steps above or an existing one you already have.