Snowflake Native App
Summary: Learn what the Dynamics 365 Connector is, its purpose, and how it enables seamless data integration from Dynamics 365 to Snowflake.
The Dynamics 365 Connector is a Snowflake Native App designed to streamline data ingestion from Dynamics 365 applications or Dataverse into Snowflake, enabling businesses to perform advanced analytics, reporting, and data management in a cloud-based environment. It leverages Azure Synapse Link with incremental CSV folders in the Azure Data Lake to automatically bring data into Snowflake, utilising incremental updates and folder structures for efficiency.
Azure Synapse Link incremental data flow from Dynamics 365 to Snowflake
Supported Dynamics Applications
Microsoft Dynamics 365 Finance, Supply Chain Management, CE, Commerce, and any Dataverse-backed Dynamics 365 or Power Platform apps.
Data Ingestion Mechanism
Incremental data updates using timestamp-based folder structures from Azure Synapse Link.
Summary: Explore the main features and benefits of the Dynamics 365 Connector for Snowflake.
- Seamless Data Integration: The connector simplifies importing data from Azure Synapse Link into Snowflake, providing support for the incremental timestamp-based folder structure used in Azure Synapse Link.
- Near-Real-Time Data Updates: It allows organisations to work with near-real-time data from Dynamics 365 applications, ensuring timely insights and analytics.
- Advanced Analytics Capabilities: Snowflake's platform allows businesses to use their Dynamics 365 data for advanced analytics, reporting, and business intelligence (BI) with tools such as dbt, Tableau, or Power BI.
- Scalable and Secure: As a native Snowflake application, the Dynamics 365 Connector is designed to handle large data volumes in a scalable manner, ensuring data integrity and security.
- Automated Data Refresh: The connector automates the process of ingesting new or updated data, eliminating manual data transfers or custom-built data pipelines.
Summary: Review the requirements you need in both Snowflake and Azure before installing the connector.
Before installing the Dynamics 365 Connector, ensure you have the following:
Snowflake Requirements
- Snowflake Account: Active Snowflake account with ACCOUNTADMIN privileges
- Account Privileges:
EXECUTE TASKandEXECUTE MANAGED TASKprivileges - Role: A role with permissions to install and manage Native Apps
Azure Requirements
- Dynamics 365 Environment: Active Dynamics 365 Finance, Supply Chain, CE, Commerce, or Dataverse environment
- Azure Subscription: Active Azure subscription with permissions to create resources
- Azure Data Lake Storage Gen2: Storage account configured for Azure Synapse Link
- Azure Event Grid: Configured for storage event notifications
Permissions
- Azure: Contributor or Owner role on the Azure subscription
- Dynamics 365: System Administrator role to configure Azure Synapse Link
Summary: Follow these steps to get the Dynamics 365 Connector up and running quickly.
Get up and running with Dynamics 365 Connector in under 15 minutes:
- Install from Marketplace Navigate to Snowflake Marketplace Search "Dynamics 365 Connector" Click "Get"
- Grant Privileges
Accept and grant required account privileges (
EXECUTE TASK,EXECUTE MANAGED TASK) - Create Integrations Set up Storage Integration and Notification Integration (see detailed guides below)
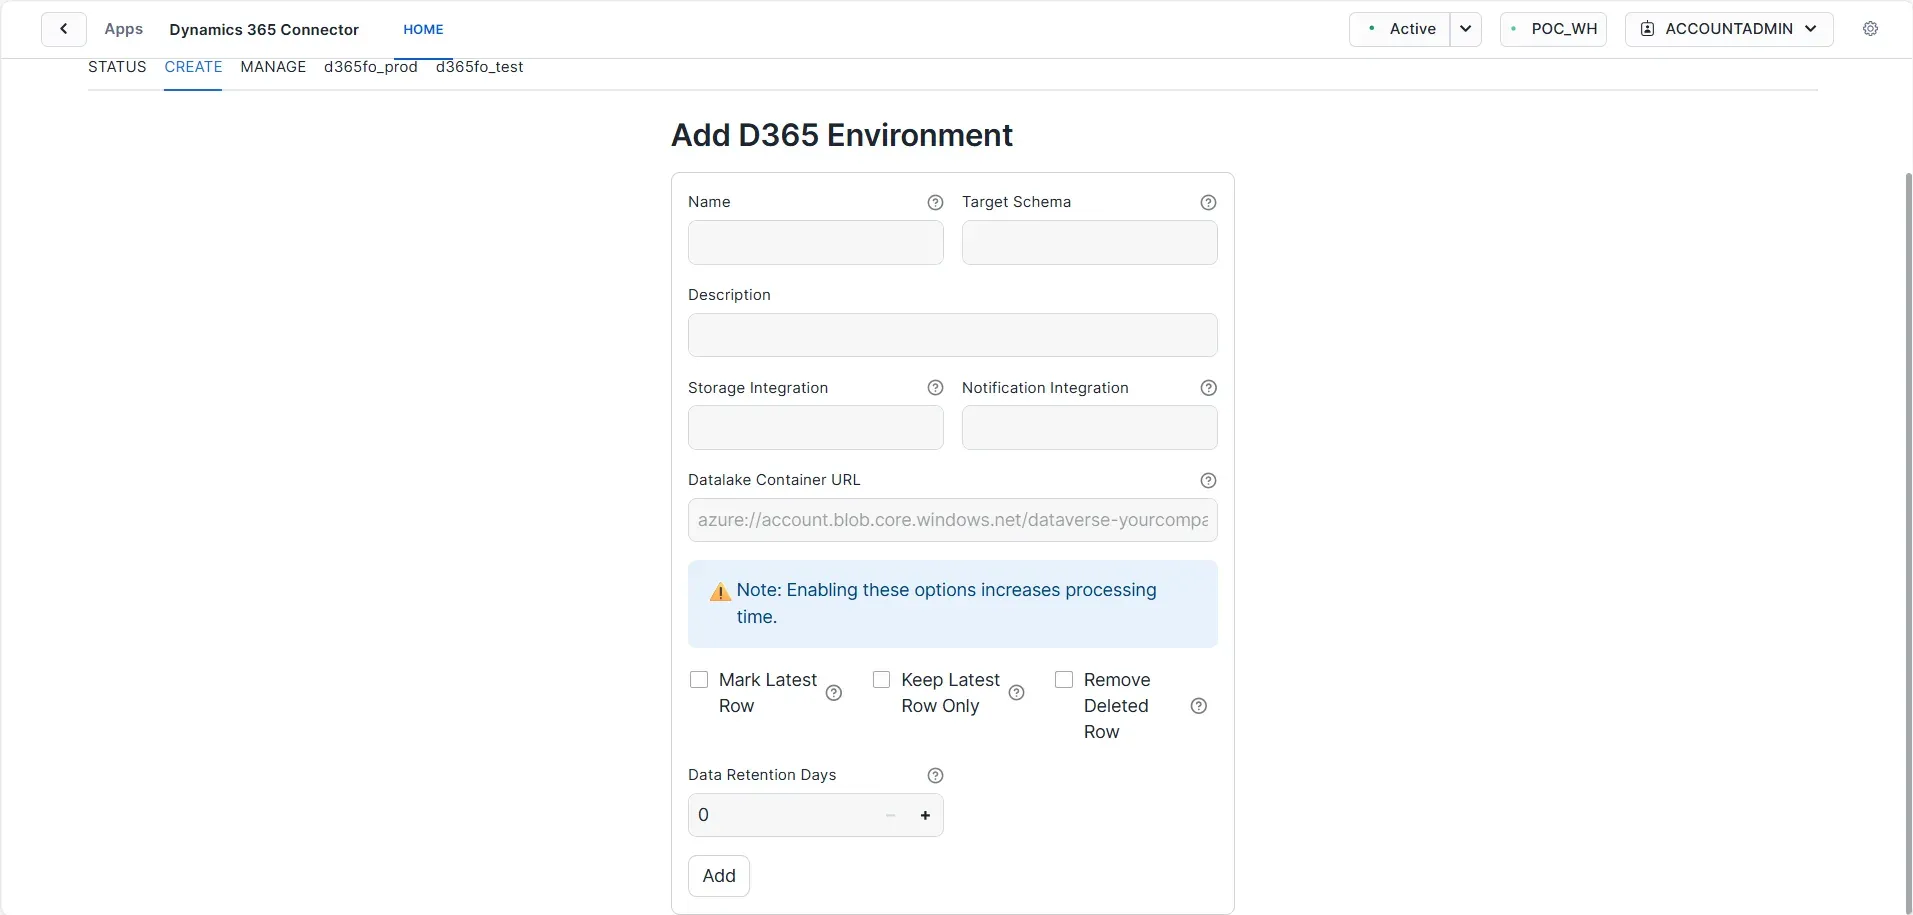
- Create Environment Open the app Create new environment Enter Azure storage details
- Start Sync Enable data synchronisation View status in the app UI
For detailed step-by-step instructions, see the Setup & Configuration section below.
Summary: Detailed instructions for configuring the connector and all required integrations.
- Install the Connector The Dynamics 365 Connector is available via Snowflake's Native Application Marketplace. Install the connector directly within Snowflake.
- Grant Required App Privilege
Grant the required privileges, events and logs from UI:
- Account level privileges:
EXECUTE TASKandEXECUTE MANAGED TASK - This app collects ERROR-level logs and records TRACES ON EVENT. Enable these logs and event sharing.
- The information collected includes the timestamp folder names in the Azure Datalake and entity names within each folder.
- Account level privileges:
- Configure Azure Synapse Link Ensure your Dynamics 365 application is set up to use Azure Synapse Link for data export.
- Create Storage Integration Please read Guide: Set up Storage Integration in Snowflake.
- Create Notification Integration Please read Guide: Set up Notification Integration in Snowflake.
- Grant USAGE Privilege
After you create the Snowflake Storage Integration and Notification Integration, grant USAGE privilege to the app using the following commands:
grant usage on integration <your_storage_integration> to application dynamics_365_connector; grant usage on integration <your_notification_integration> to application dynamics_365_connector; - Create New D365 Environment Set up a new environment in the app connected to a Dynamics 365 Azure Data Lake container.
- Set Data Synchronisation Scheduled data synchronisation depending on business requirements and Azure Synapse Export frequencies.
- Start Querying Data Once the data is ingested, users can start querying the data in Snowflake using standard SQL and integrating it with analytics tools.
Summary: Understand which Snowflake objects you need to create and configure for the connector to work.
You are required to create the following Snowflake integration objects in your Snowflake account and grant the necessary usage privileges to this application. Furthermore, when setting up a new environment, you will need to provide these objects in the Create Environment form.
Should you require assistance in creating these objects, please do not hesitate to reach out to us. We are here to support you.
Storage Integration
To facilitate the ingestion of data from the Azure Storage Account where the Azure Synapse Link exports data, it is imperative to create a Snowflake storage integration. This integration acts as a bridge, allowing Snowflake to securely access and retrieve data stored in Azure.
When setting up the storage integration, it is essential to ensure that it is configured with the appropriate permissions and access rights. Specifically, the storage integration must be granted access to the Azure Synapse Link's Azure Storage container. This access is crucial for enabling seamless data flow and integration, ensuring that Snowflake can efficiently ingest the data it requires for analytics and reporting.
Additionally, proper configuration of the storage integration not only enhances data accessibility but also optimizes performance and resource utilisation within Snowflake. By ensuring that the integration is correctly set up, organisations can achieve reliable and timely data ingestion, which is vital for informed decision-making and operational efficiency.
Notification Integration
A notification integration is essential to inform Snowflake when a new data folder is ready for ingestion. Implementing this integration not only streamlines the data ingestion process but also optimizes resource utilisation. By leveraging a notification integration, organisations can substantially reduce the costs associated with synchronising the data lake file list with Snowflake.
This proactive approach minimizes the need for continuous polling or manual checks, ensuring that Snowflake is promptly updated with the latest data. Consequently, it enhances operational efficiency and allows for more timely access to critical data for analysis and reporting.
User Interface
Monitor the synchronisation status of your Dynamics 365 tables. View last sync times, record counts, and identify any sync errors or warnings.
Configure new connections to Dynamics 365 environments. Specify Azure Storage account details, event grid settings, and target Snowflake objects.
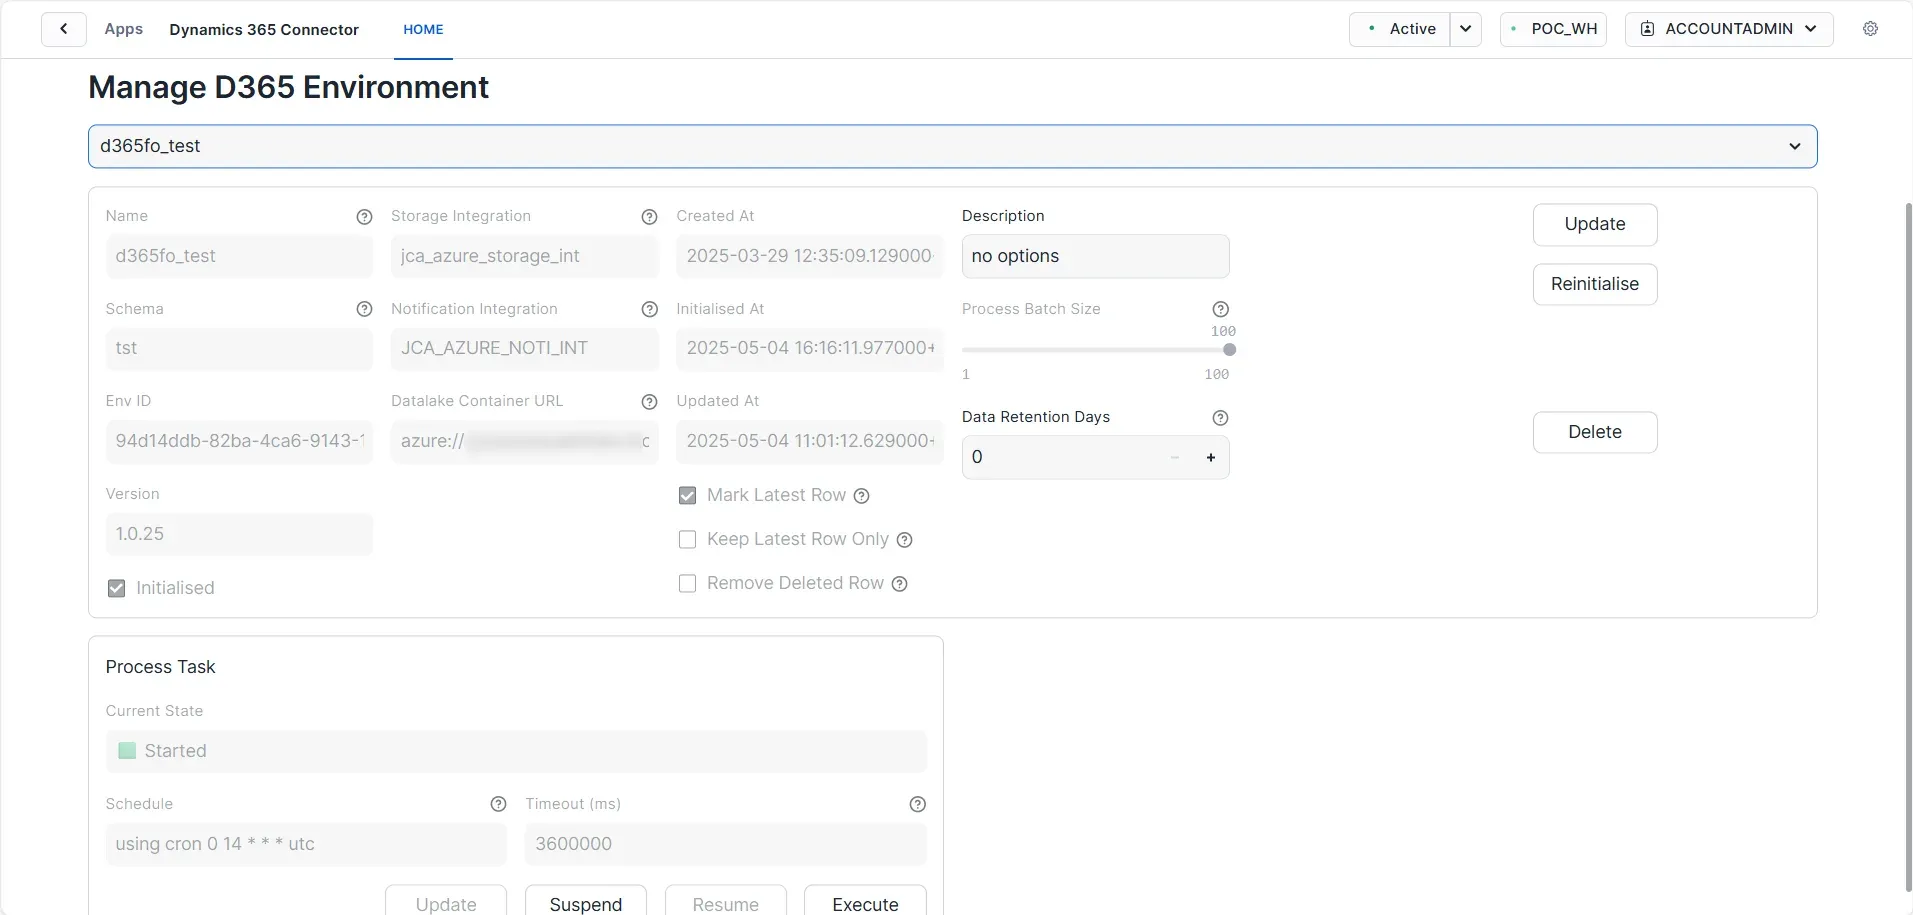
Update existing connection settings, pause/resume synchronisation, and manage table selections for sync operations.
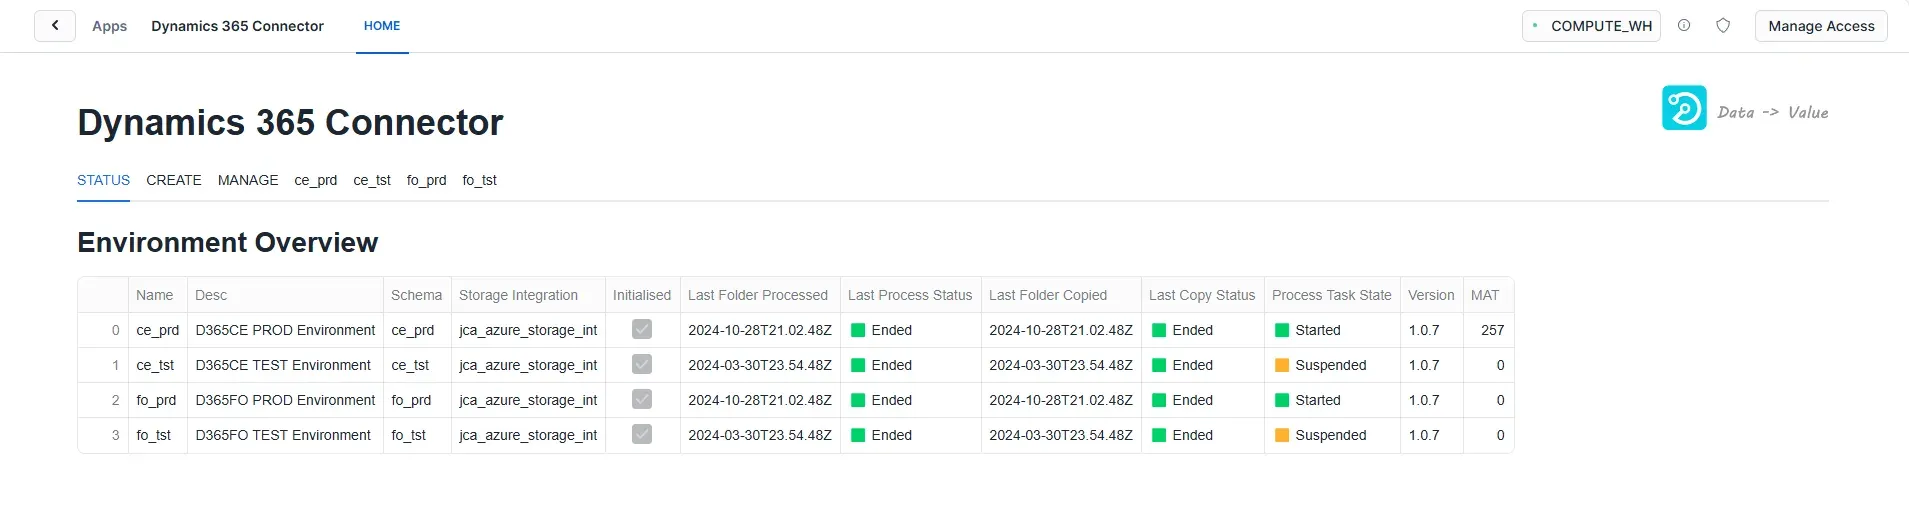
A dedicated UI tab provides users with detailed insights into the status and task process history for each created environment. This tab is vital for effectively monitoring and managing the specific environment.
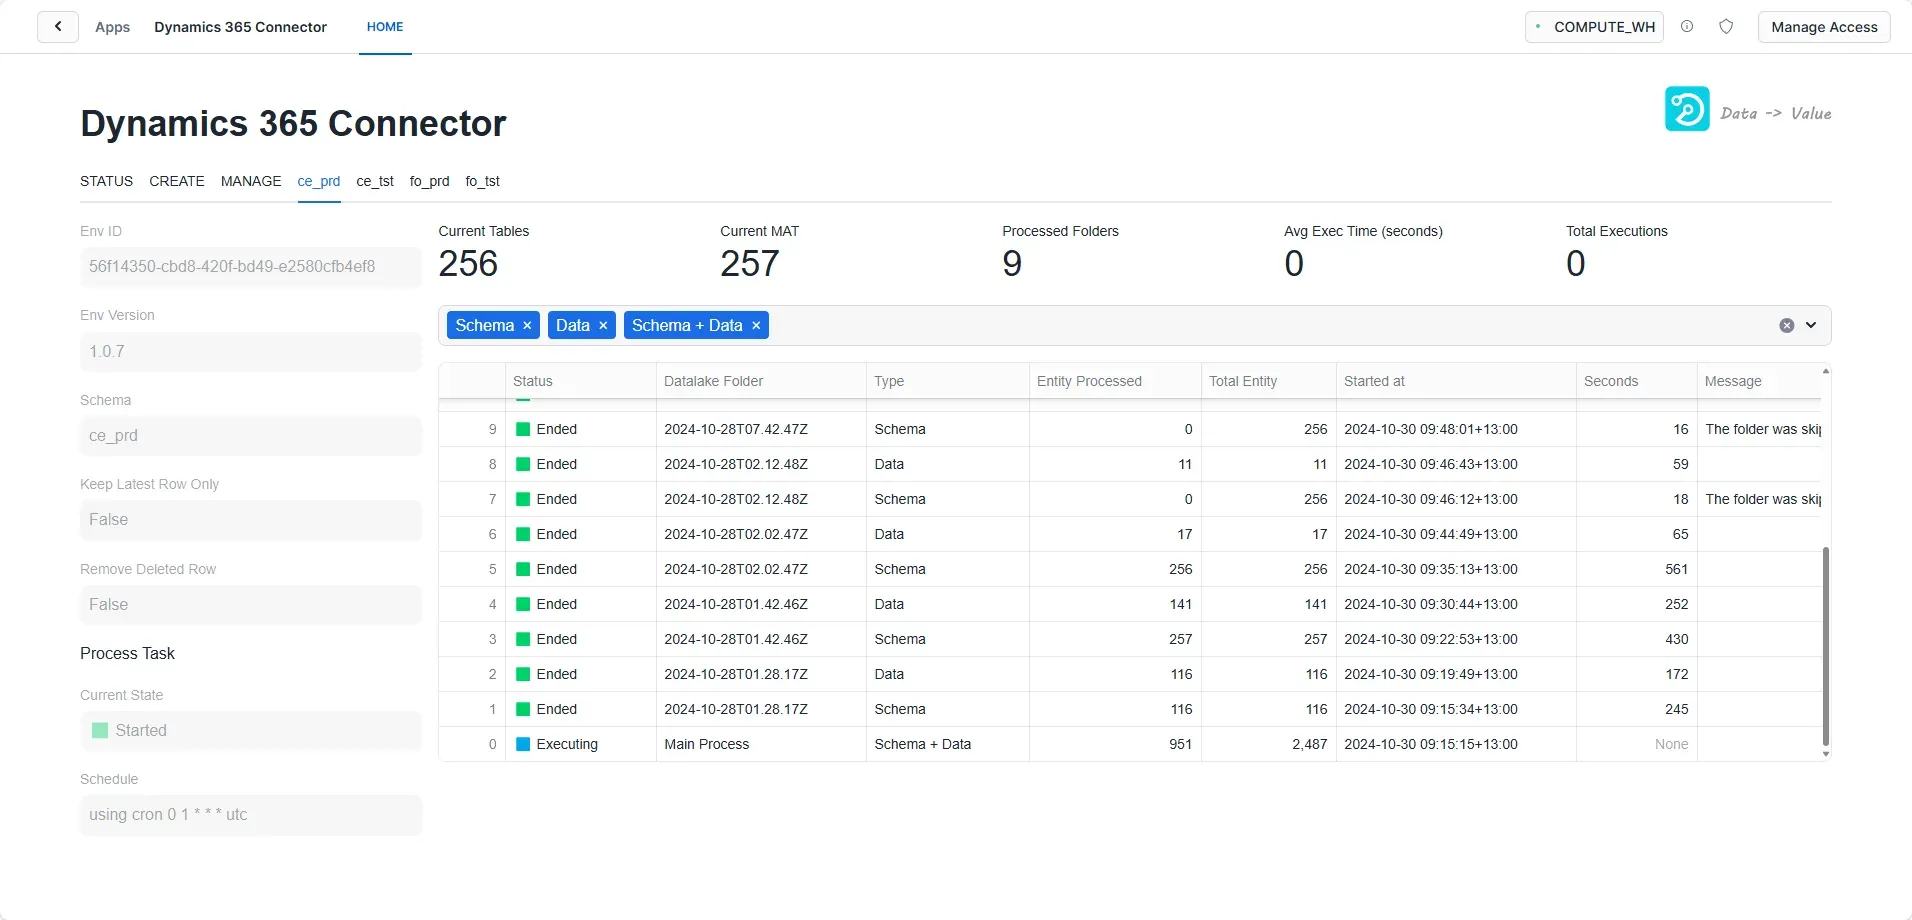
In the screenshot above, four environments are created, namely "ce_prd", "ce_tst", "fo_prd" and "fo_tst".
Key Features of the Dedicated Environment UI Tab
- Status Overview: Users can quickly view the current status of the environment, including whether it has been started, suspended, or is experiencing any issues.
- Task Process History: The tab maintains a comprehensive log of all task executions associated with the environment, including execution dates/times, outcomes, and duration.
- Actionable Insights: The dedicated tab highlights any warnings or errors during task execution and suggests actions for resolution.
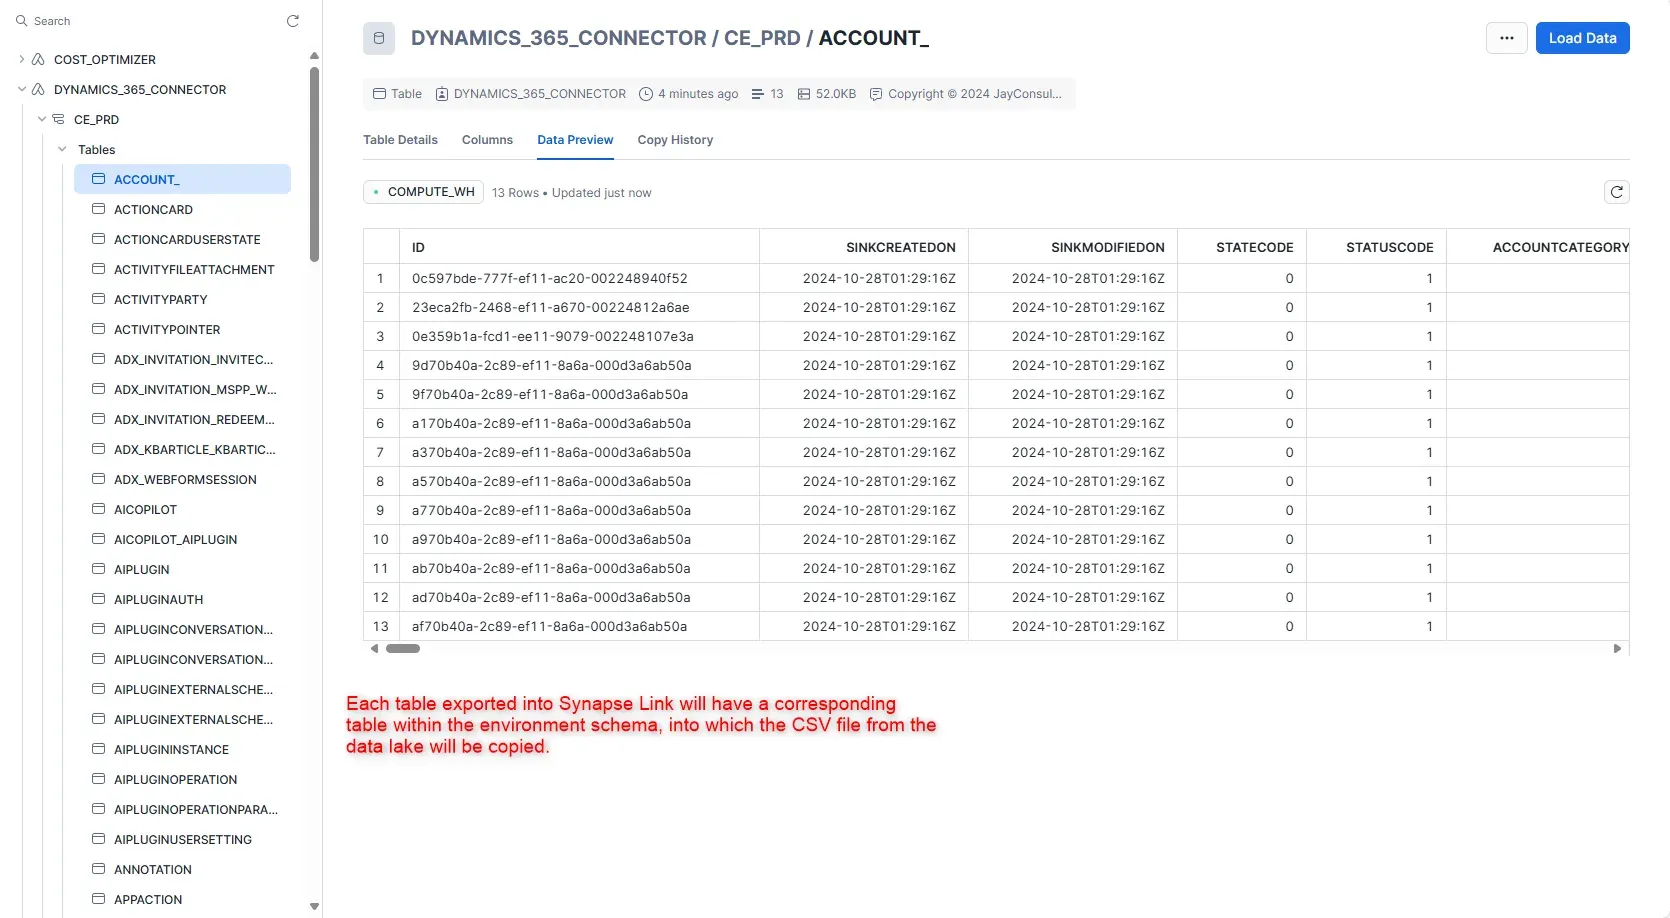
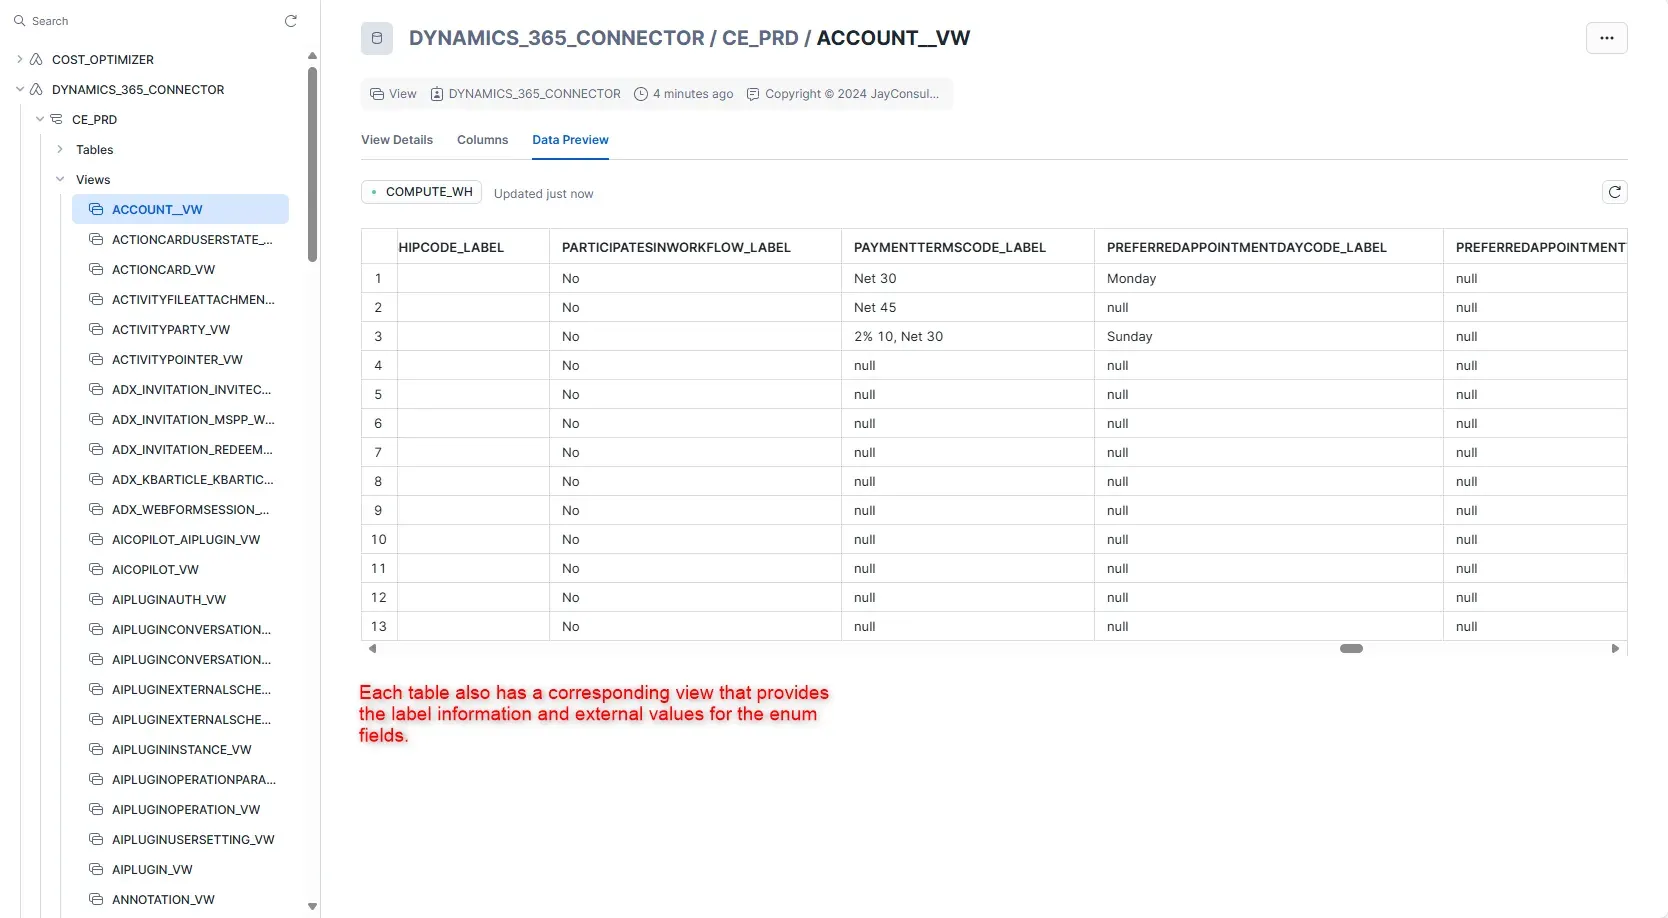
Database Schema Overview
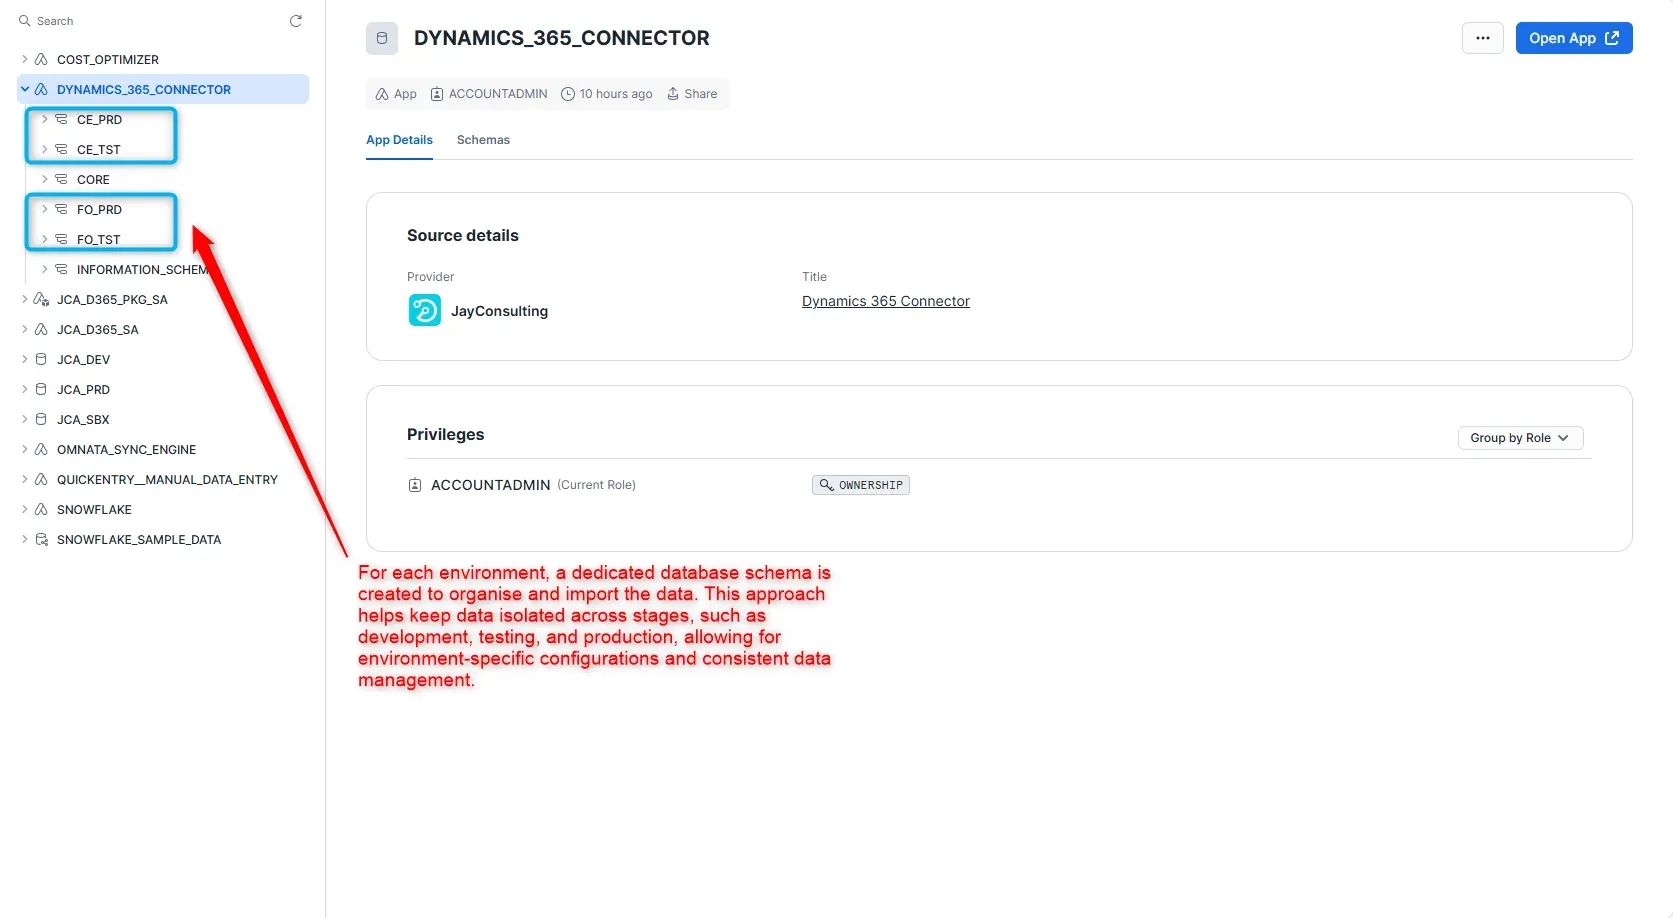
Table Structure
View Definitions
Setup Guides
Below are helpful How-to Guides if you have not previously configured Azure Synapse Link or the required Snowflake objects.
- Log into the Azure Portal.
- Follow the Microsoft documentation to create a storage account.
- Create a storage account to use with Azure Data Lake Storage
- Choose a Standard general-purpose v2 account type.
- In the Advanced settings, make sure to enable the hierarchical namespace.
- Enable Azure Synapse Link in Dynamics 365
- Sign in to Power App Open your Power Apps and log in to the Dataverse environment linked with D365FO environment.
- Create Azure Synapse Link
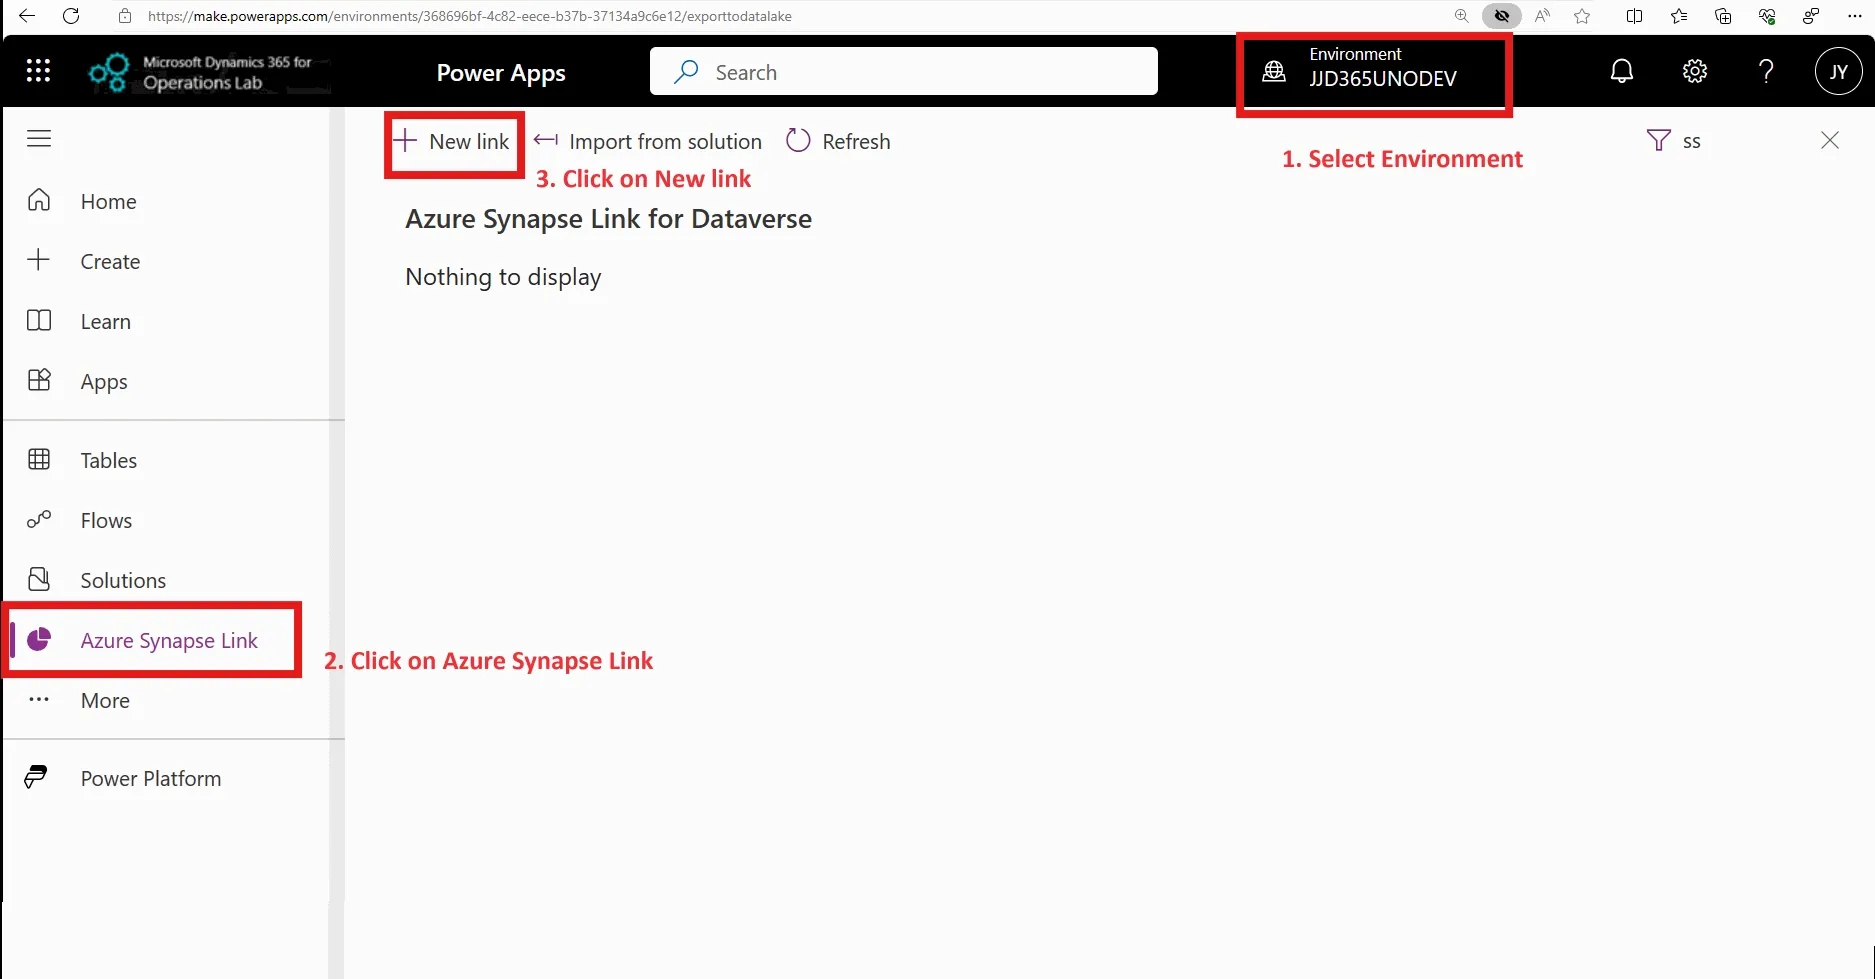
- On the left navigation pane, select Azure Synapse Link.
- On the Azure Synapse Link for Dataverse page, select + New link on the command bar.
- Select Azure Storage Account
- Select Subscription, Resource group and a Storage account. You don't need to provide a Synapse workspace or a Spark pool.
- Select Next. The option to choose tables appears.
- Enable Incremental Update Folder Structure
- Select Advanced, select Show advanced configuration settings, and then enable the option Enable incremental update folder structure
- In the Time interval field, choose the desired frequency for reading incremental data. Using this frequency, the system partitions data into time stamped folders such that you can read the data without being impacted by ongoing write operations.
- Select the Dataverse tables you want. You can also select finance and operations tables. The options Append only and Partition available at a table level are ignored. Data files are always appended and data is partitioned yearly.
- Select Save. Tables selected are initialised and you see incremental data in the storage account.
Please see Microsoft documentation for more detail:
- Log in to Snowflake Access your Snowflake account through your Snowflake web interface.
- Create Storage Integration
You can create a storage integration using the Snowflake SQL command. Here's a template command:
create storage integration <your_storage_integration> type = external_stage storage_provider = 'azure' enabled = true azure_tenant_id = '<your_azure_tenant_id>' storage_allowed_locations = '<your_container_url>' ;- <storage_integration_name> is the name of the storage integration object.
- <azure_tenant_id> is your Azure tenant ID.
- <azure_container_location> is the location of the Azure storage containers where the incremental folders reside.
- Run the code below to get the Azure Consent URL and the integration name.
describe integration <storage_integration_name>;Copy the azure_consent_url and paste it into a browser. Follow the on-screen prompt to give authorisation. Note down the azure_multi_tenant_app_name; this will be used to access the Azure storage container.
- In Azure Portal, Navigate to the Azure Data Lake container. Under Access Control (IAM), assign the Storage Blob Data Reader role to the newly created azure_multi_tenant_app_name.
Please follow the detailed instructions from Snowflake Documentation:
- Create an Azure Storage Queue
- Open Azure Portal Navigate to your Azure Portal: Azure Portal.
- Create a Storage Queue
- Go to your Storage Account.
- Under Data Storage, select Queues.
- Click on + Queue to create a new queue.
- Enter a name for your queue and click OK.
- Create an Event Grid Subscription
- Navigate to Event Grid In the Azure Portal, search for Event Grid and select Event Subscriptions.
- Create a New Event Subscription Click on + Event Subscription.
- Configure the Event Subscription
- Name: Provide a name for your event subscription.
- Event Schema: Select Event Grid Schema.
- Event Type: Choose the types of events you want to listen to (e.g., Blob Created, Blob Deleted, etc.).
- Endpoint Type
- Choose Azure Storage Queue as the endpoint type.
- Under Endpoint, select your storage account and then select the queue you created earlier.
- Filter Options
Add filters sent to the queue. When setting up an Azure Event Grid Subscription, utilising subject filters to refine the events that trigger the subscription is beneficial. Specifically, you can configure the filters to capture only those events where the subject ends with /model.json. This approach is particularly advantageous for applications designed to synchronise model.json files into Snowflake.
By focusing solely on the model.json files, the system can efficiently monitor for changes and automatically sync data when new folders are added. This targeted filtering not only streamlines the data ingestion process but also reduces the volume of irrelevant events that need to be processed.
Implementing subject filters enhances performance by minimizing the load on the event processing system and ensuring that Snowflake remains updated with the most pertinent information. This method promotes an efficient workflow, enabling timely access to critical data for analytics and reporting purposes.
- Create Subscription Click Create to finalise the event subscription.
Summary: This guide walks you through creating a notification integration in Snowflake to receive Azure Event Grid events via an Azure Storage Queue, enabling automated and efficient data ingestion.
- Log into Snowflake
- Access your Snowflake account.
- Create the Notification Integration
- Use the following SQL command to create a notification integration for Azure Storage Queue:
create notification integration <your_notification_integration> type = queue notification_provider = azure_storage_queue enabled = true azure_tenant_id = '<azure_tenant_id>' azure_storage_queue_primary_uri = '<azure_storage_queue_primary_uri>' ; - where:
- <notification_integration_name> is the name of the notification integration object.
- <azure_tenant_id> is your Azure tenant ID.
- <azure_storage_queue_primary_uri> is a queue created for receiving data lake blob create events.
- Use the following SQL command to create a notification integration for Azure Storage Queue:
- Run the code below to get the Azure Consent URL and the integration name.
describe integration <notification_integration_name>;Copy the
azure_consent_url, paste it into a browser, and follow the on-screen prompt to give authorisation. Note down theazure_multi_tenant_app_name; this will be used to access the Azure Storage Queue.
- In Azure Portal
- Navigate to the Azure Data Lake queue.
- Under Access Control (IAM), assign the Storage Queue Data Contributor role to the newly created
azure_multi_tenant_app_name.
- Verify the notification integration
- Each created environment will have an external stage mapped to the Data Lake container. This stage mirrors the full container folder and file structure of the container at the time of environment initialisation.
- After initialisation, any newly created folders in the Data Lake should be reflected in the stage through the notification integration. If the latest folders aren't showing up, verify that the notification integration is correctly set up — it's responsible for triggering the stage refresh when new folders or model.json files are added.
Please follow the detailed instructions from Snowflake Documentation:
Troubleshooting & FAQ
Symptom
New data from Dynamics 365 is not appearing in Snowflake tables.
Possible Causes & Solutions
- Azure Synapse Link Not Configured: Verify Azure Synapse Link is enabled and exporting data to Azure Data Lake. Learn more
- Notification Integration Issue: Check that the notification integration is properly configured and receiving events. Snowflake Docs
- Task Suspended: Review task history in the Environment tab to check for errors or suspended tasks.
- Storage Integration Permissions: Verify the storage integration has access to the Azure Data Lake container.
Symptom
Error messages related to insufficient privileges or access denied.
Solutions
- Verify Account Privileges: Ensure
EXECUTE TASKandEXECUTE MANAGED TASKare granted. - Check Integration Usage: Confirm USAGE privilege is granted on both storage and notification integrations.
- Azure IAM Roles: Verify the Snowflake service principal has Storage Blob Data Reader and Storage Queue Data Contributor roles.
Symptom
Expected tables or columns from Dynamics 365 are missing in Snowflake.
Solutions
- Azure Synapse Link Export: Check which entities are configured for export in Azure Synapse Link.
- Data Lake Folder Structure: Verify the folder structure matches the expected timestamp-based format.
- Manual Refresh: Trigger a manual refresh from the Environment tab to force a sync.
Summary: Find answers to common questions about data sync, historical data, deletions, and multi-environment support.
How often does data sync?
Data syncs based on the schedule configured in your environment settings and Azure Synapse Link export frequency. Typical intervals range from 15 minutes to hourly.
Can I sync historical data?
Yes, the connector will ingest all existing data in the Azure Data Lake at the time of environment creation, then continue with incremental updates.
What happens if I delete data in Dynamics 365?
Deletions are reflected in Snowflake based on Azure Synapse Link's change tracking. The connector processes incremental updates including deletes.
Can I use multiple environments?
Yes, you can create multiple environments for different Dynamics 365 instances, such as production and testing environments.
Back to TopNext Steps
Summary: Get help, access documentation, and learn about support options for the Dynamics 365 Connector.
Get Started
- Installation Support: Contact JayConsulting for guided installation assistance
- Licensing & Pricing: Inquire about enterprise licenses and volume pricing
- Custom Configuration: Professional services for complex integration scenarios
Additional Resources
Enterprise Support
- Priority technical support with fast response times
- Custom feature development
Ready to connect your Dynamics 365 to Snowflake?
Contact us to learn more about the Dynamics 365 Connector and how it can benefit your organisation.
Schedule a Consultation